 Give a user permissions to a table, Workflow, or integration
Permissions are determined by a user’s Role and Individual Permission Settings. Individual permission settings govern which users can edit or view any given Workflow, data table, or integration. These are separate from roles and are governed per-object, which means per-Workflow, per-Data Table, and for integrations, per-connection
User must be explicitly given permission to view or edit a Workflow, data table, or integration object. The sole Team Owner is the only user that can view or edit any object.
To manage a user’s role or workflow editing permission, see change a user’s role or editing permissions.
How to give view or edit permissions for a Workflow 
Individual Workflow permissions overwrite any role level permissions. For example, an Admin without Find/Edit permissions on a Workflow cannot find or edit that Workflow.
The individual Workflow permissions are set per-Workflow.
- Select Workflows from the top navigation bar.
- Select a Workflow, this will open the Workflow detail page.
- Select
 in the upper-right corner to get to the Workflow Builder page.
 - Select the
 in the top right, and select Settings
 -
Scroll down to the Security section, and click to expand it.

-
Update the users or groups who can find and edit the Workflow.
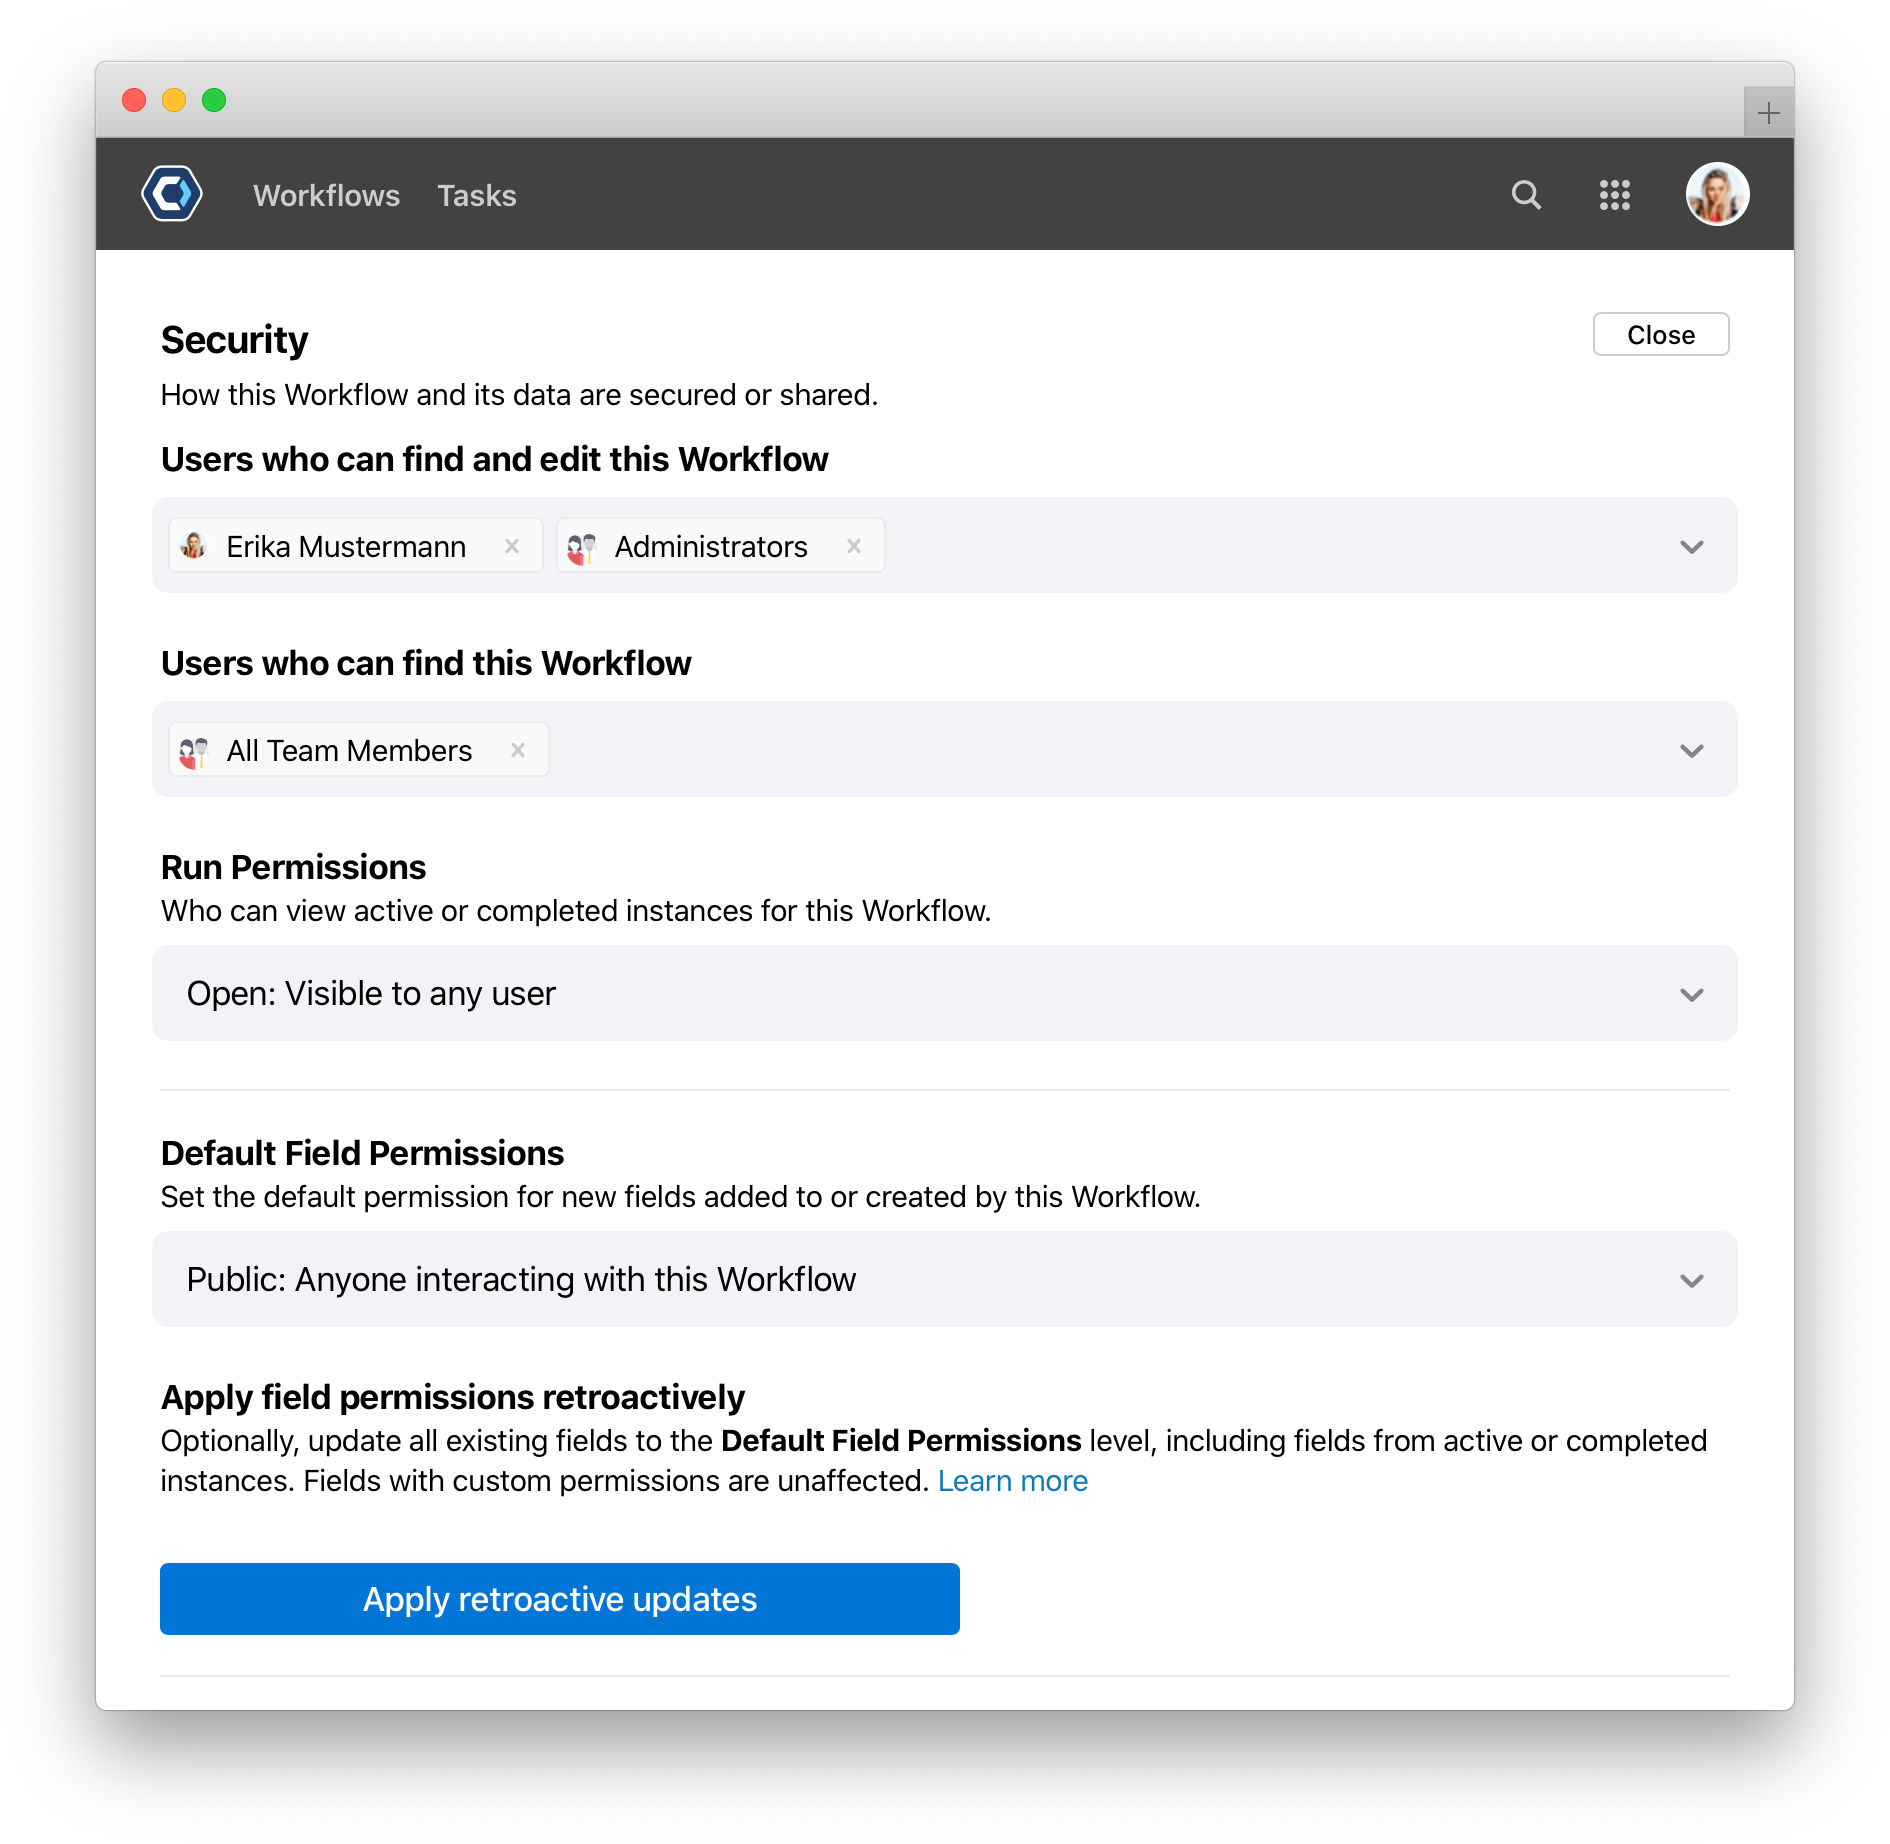
This is an example of the Workflow permissions screen
💡 Tip: Admins can be removed from the field, but permission fields cannot be left blank.
Individual Workflow permissions
Use this diagram to understand what a user with No Permissions, a user with Find Permissions, or a user with Edit Permissions are each able to do. Individual permissions can look very different Workflow to Workflow.

How to give edit permissions for a data table
Individual Data Table permissions overwrite any role level permissions. For example, an admin or team member without permissions to view a data table cannot view the table.
The individual data table permissions are set per-data table. Set data table permissions to restrict which users can see select data tables.
- Open the
 menu in the top navigation bar, and select Data.
 - Select a data table.
-
Select the
button and select Permissions. This opens a new screen to change permissions.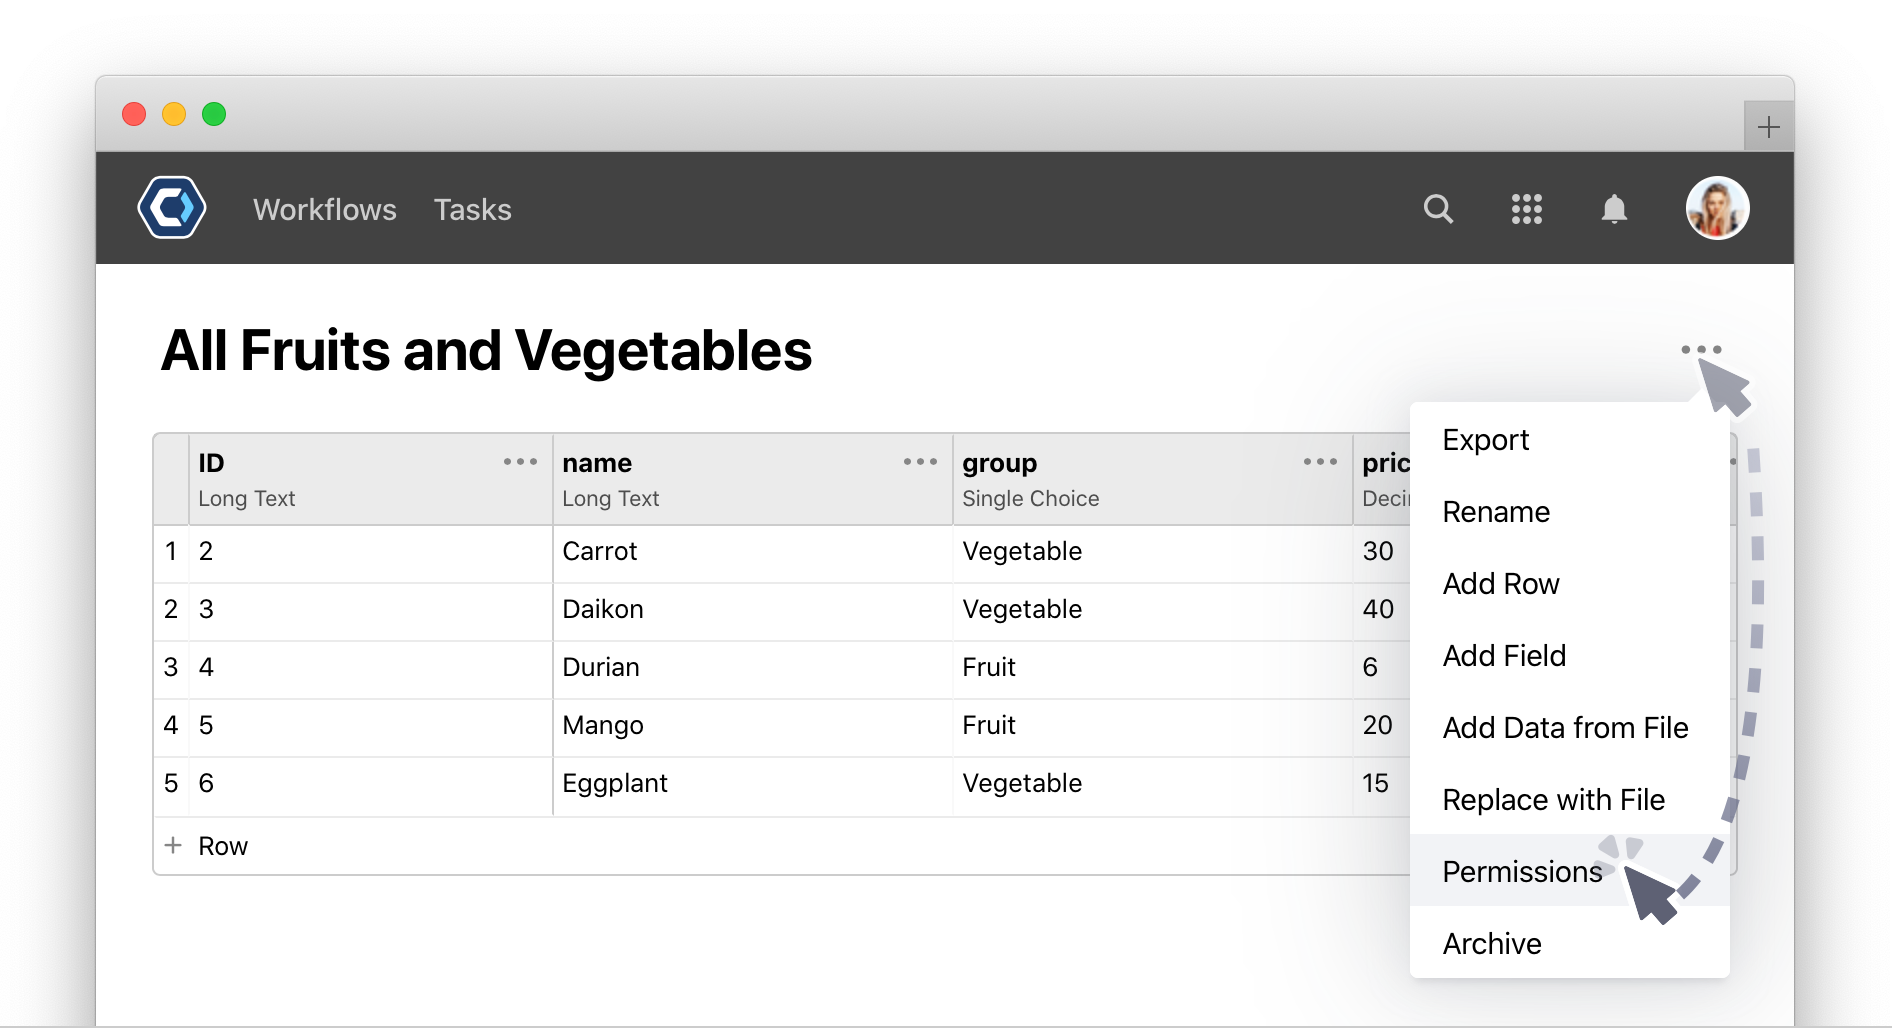
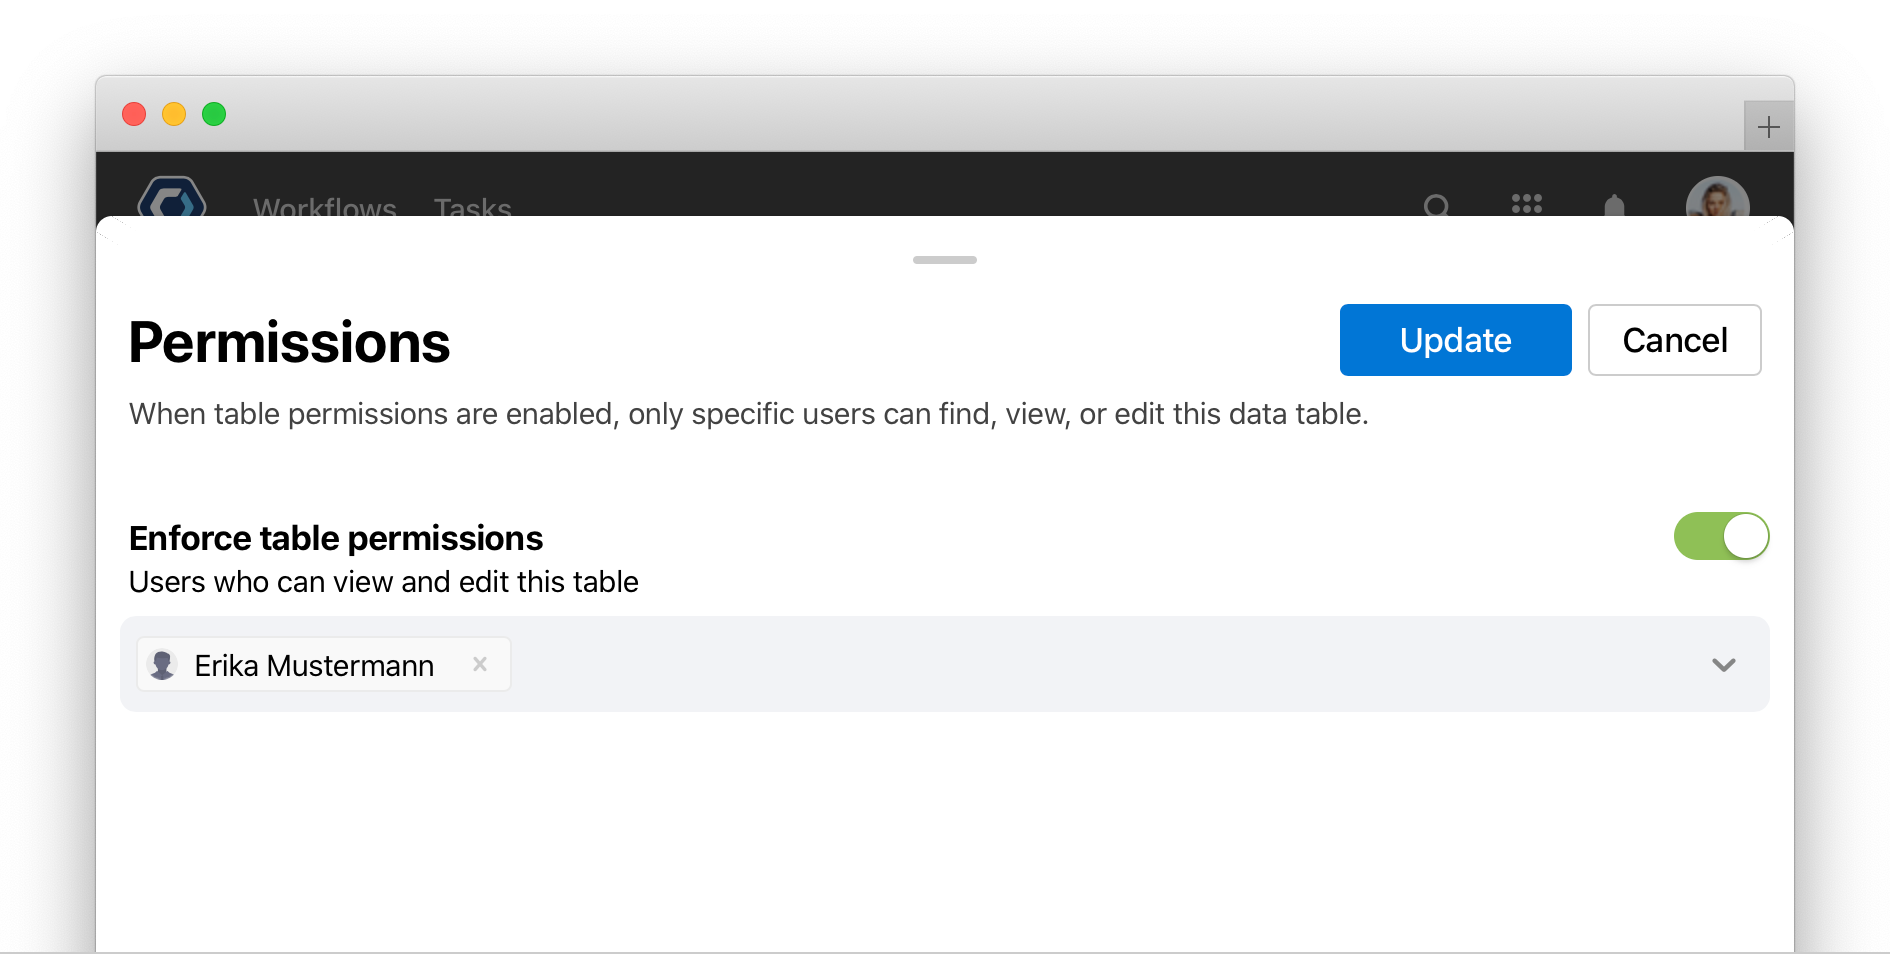
- From the permissions page, toggle Enforce table permissions on or off. If enabled, only specific users have access to find or edit the data table.
-
Add or remove the individual users who can view the table. Only users on the list can find or edit the table.
Individual Data Table Permissions
Use this diagram to understand what a user with with Permissions, or a user without Permissions are each able to do. Individual permissions can look very different between data tables.

How to give permission to use an integration connection
An integration is a connection to an app or tool within PagerDuty Workflow Automation. Integrations can have multiple connections. Permissions can be set per-connection in PagerDuty Workflow Automation.
Individual integration permissions overwrite any role level permissions. For example, an admin or team member without permissions to use a connection cannot use the connection.
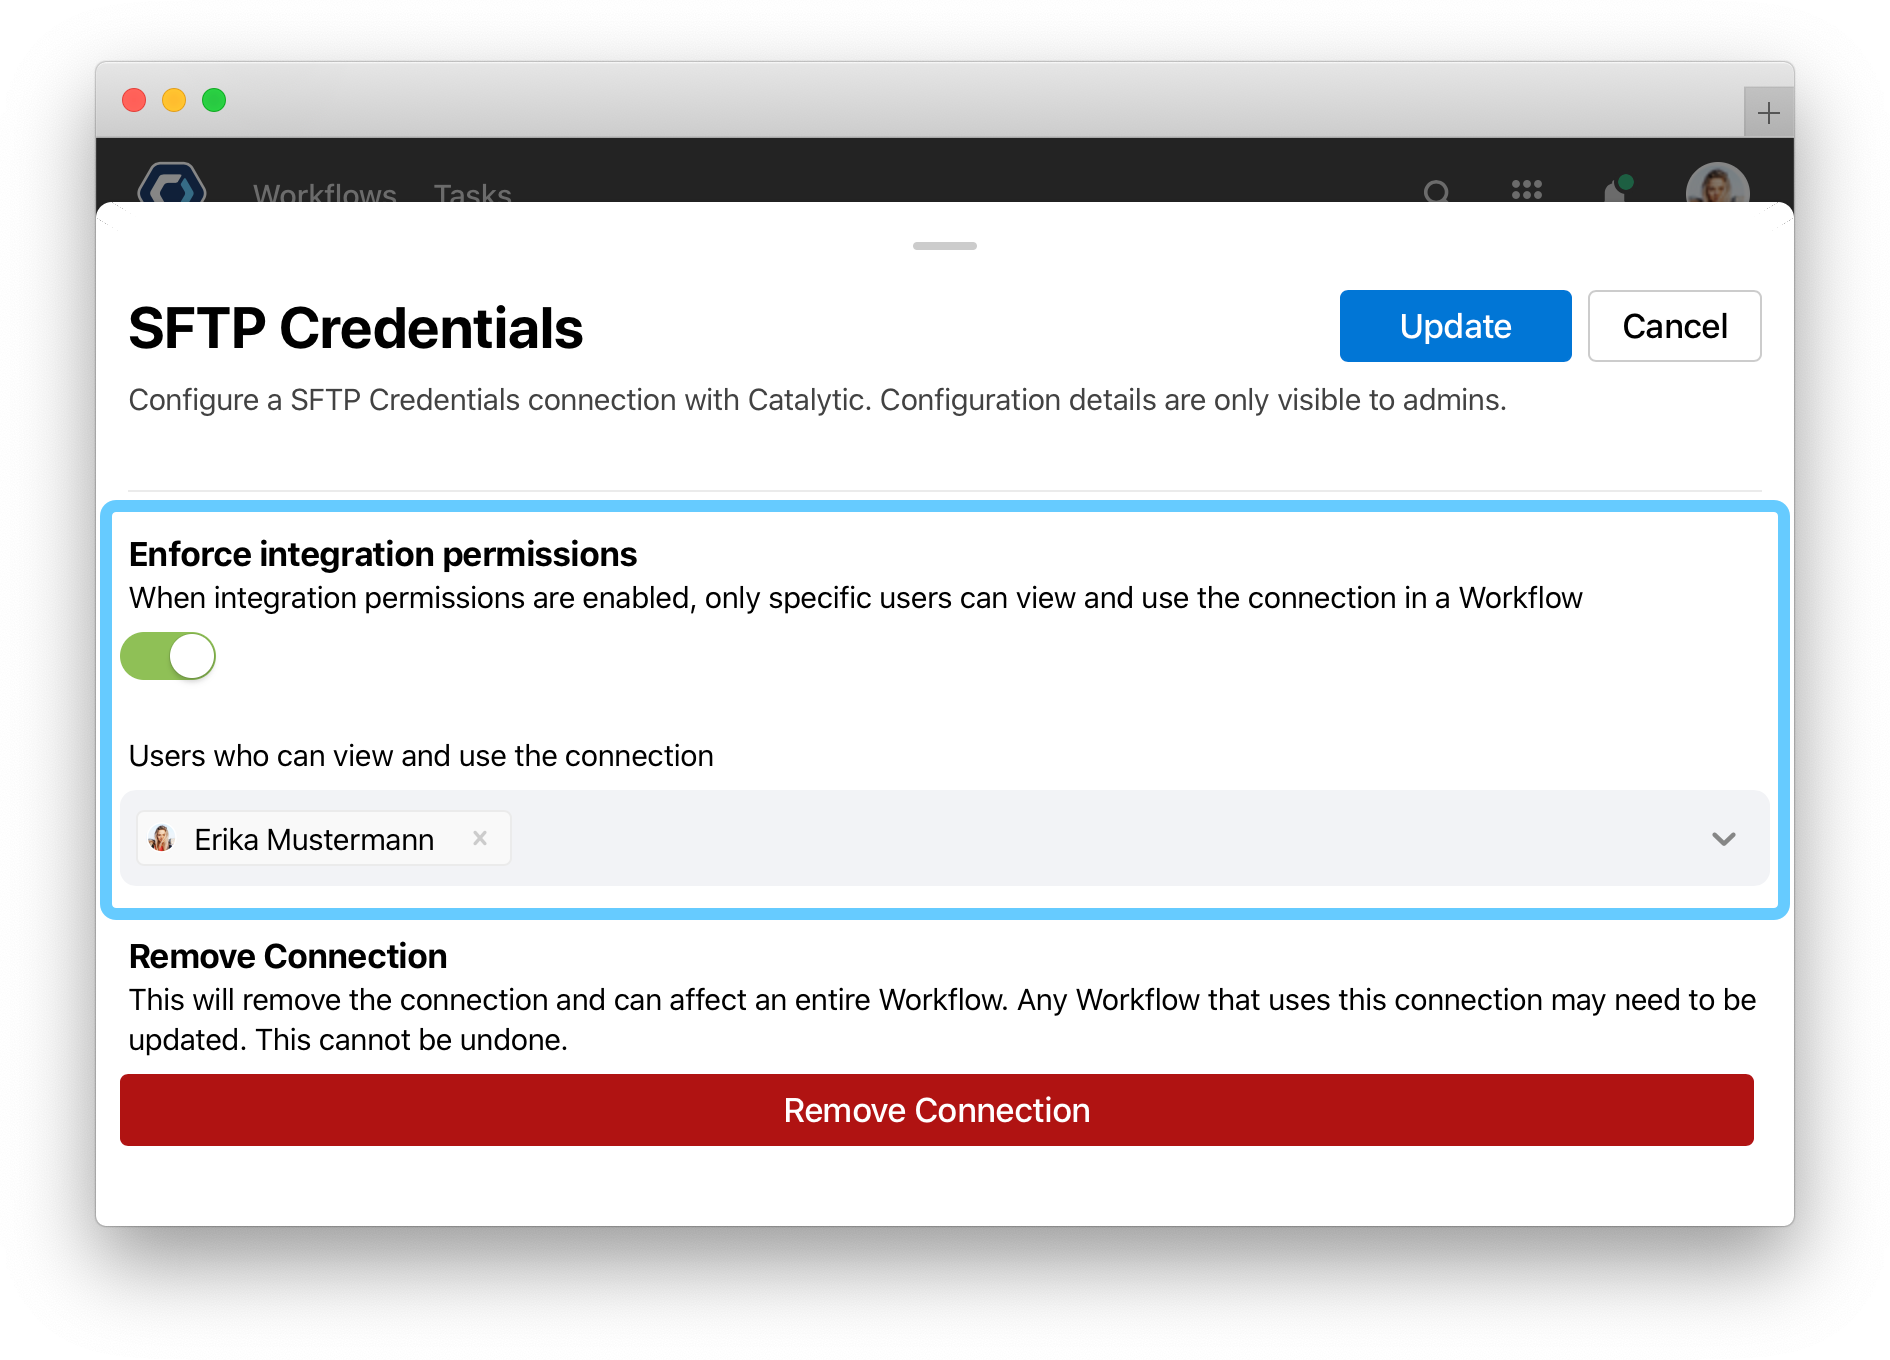
✅ Heads-up: A connection is only editable by the connection creator. Integration permission levels can be changed at any time from the integration page.
- Open the menu in the top navigation bar, and select Admin.
-
Select Integrations at the bottom of the page.

- Select the integration you wish to edit.
- Select
 for the connection you wish to modify.
 -
At the bottom of the page, toggle Enforce integration permissions on or off. If enabled, only specific users have access to use the connection in a process. This does not affect which users can run the Workflow in general.
- Select
 when completed.
Individual Integration Permissions
Use this diagram to understand what the connection creator, a user with Permissions, or a user without Permissions are each able to do.

How to give permissions to use actions or integrations
The Action & Integration Manager helps admins review and manage which actions and integrations are enabled team-wide, or even by user. For example, you could disable actions for your entire team, or limit access to an action by group.
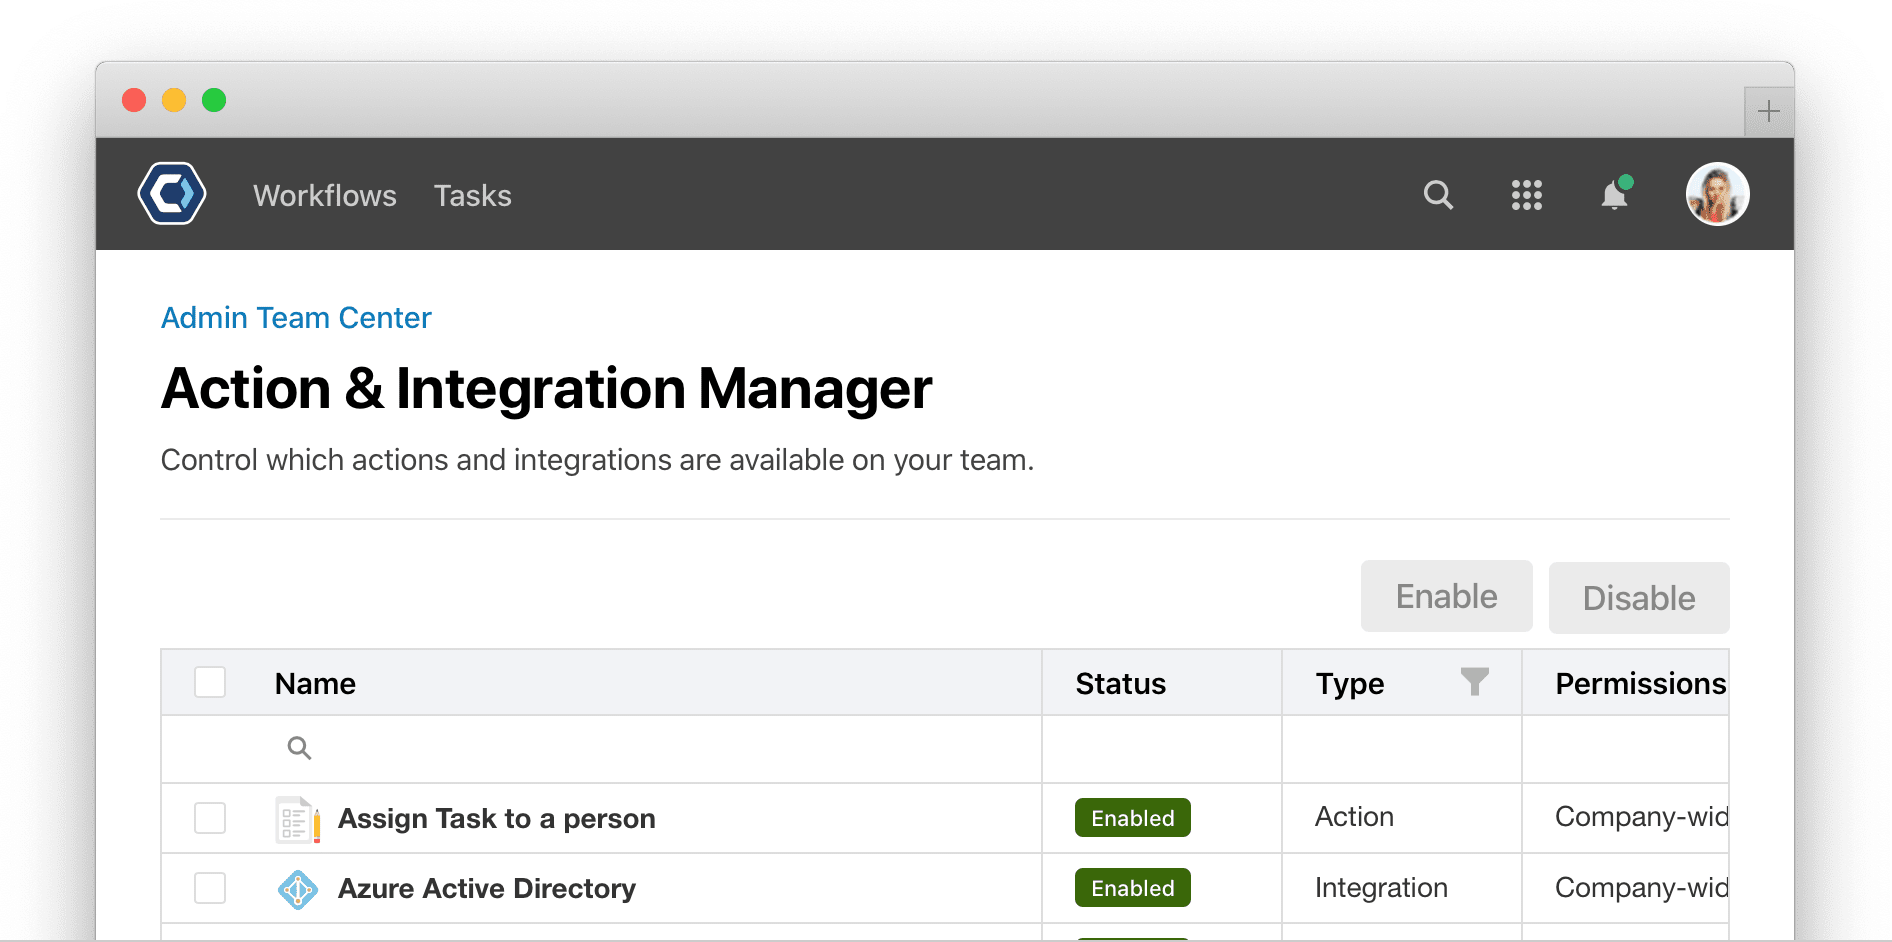
Action and integration status are set per-Item, and can only be set by admins from the Action & Integration Manager
- Navigate to the Admin Team Center. Select from the top navigation bar > Admin
- Select Action & Integration Manager
- From the Action & Integration Manager page, click an item to open the Manage Action page, and change the Status or Users who can find or use this item.
- To change the status of multiple items at once, click the check box next to each item, then select
 or
or  to change the status.
Check the Action & Integration Manager Article for more information.
## How to set permissions on a web form
Set permissions on a web form to limit who can find, view, or submit the web form. You can set permissions from the web form configuration page. Permissions are set per-Web form. You can set permissions for web form actions and web form triggers.
Permissions can be set as public, internal, confidential, or email recipients.
- Public: Visible to anyone.
- Internal: Visible to team members only.
- Confidential: Visible to designated users only. You can select which users to share the web form with.
- Email Recipients: Visible to email recipients only. Only available for web form actions.
Thanks for your feedback
We update the Help Center daily, so expect changes soon.
Link Copied
Paste this URL anywhere to link straight to the section.