Customize and Generate a Document
Get up to speed fast and learn the basics of automation and building with Workflows. If you’re brand new to PagerDuty Workflow Automation, head over to the Getting Started guide. If you’re ready to start building Workflows and automating work for your team or company, you’re in the right place!
Introduction 
In this guide, you will learn how to build and automate a business process with a Workflow— without any code. If you’re new to PagerDuty Workflow Automation, the goal is to introduce you to the basics of building Workflows. We have a fun, no-code platform that’s great for business users; you’ll be dragging and dropping your way to automation in no time.
You will build a Workflow that lets you generate a custom and dynamic Word document based on a template. By the end, you’ll be able to run the Workflow, complete a task and input some preferences, then auto-populate the document based on your choices.
This is a great process to start with as it’s easy to build and covers a lot of concepts—you’ll use the same drag and drop skills here to build almost anything in PagerDuty Workflow Automation.
When you’re first getting started with, it’s helpful to take a step back and get familiar with the basics. Let’s start there!
How a Workflow works
All Workflows in PagerDuty Workflow Automation are assembled together like building blocks. Each building block is an automation or manual action that’s performed. A flowchart is a great way to imagine how these blocks come together.

PagerDuty Workflow Automation has a library of actions that work with Excel, Google Drive, PowerPoint and many other files and applications. These actions can be mixed and matched to automate work. Whatever the actions used, they can be combined together into a process automated with a Workflow. So these 3 steps could be anything, for example:
With PagerDuty Workflow Automation, the mundane or repetitive tasks are automated with a Workflow, while the creative and high value work is still done by people. We help orchestrate and coordinate that work between automation and people.
This coordination is a unique and powerful feature of PagerDuty Workflow Automation—it becomes a dashboard for interfacing with automation, where team members can integrate automation into their day to day work. One of the first things we’ll do is assign a task to a user, and then use those answers in automated tasks.
Create a Workflow
Let’s build that process we talked about earlier—automate creating a custom and dynamic word document.
Step 1. Create a new Workflow
We’ll start off by creating the Workflow that will automate this process. We’ll give it a name and description, then jump in and start configuring it.
- From your PagerDuty Workflow Automation home screen, select Workflows in the top navigation bar.
- Click the
 button on the top right of the screen.
 - Select Blank Template.
- Set up the Workflow as follows:
- Name:
Custom white paper - Description:
Add a logo, company name, and select from the available templates to create a unique company white paper Great for meetings with customers - Leave category and owner as is.
- Name:
- Select the Next: Configure this Workflow button.
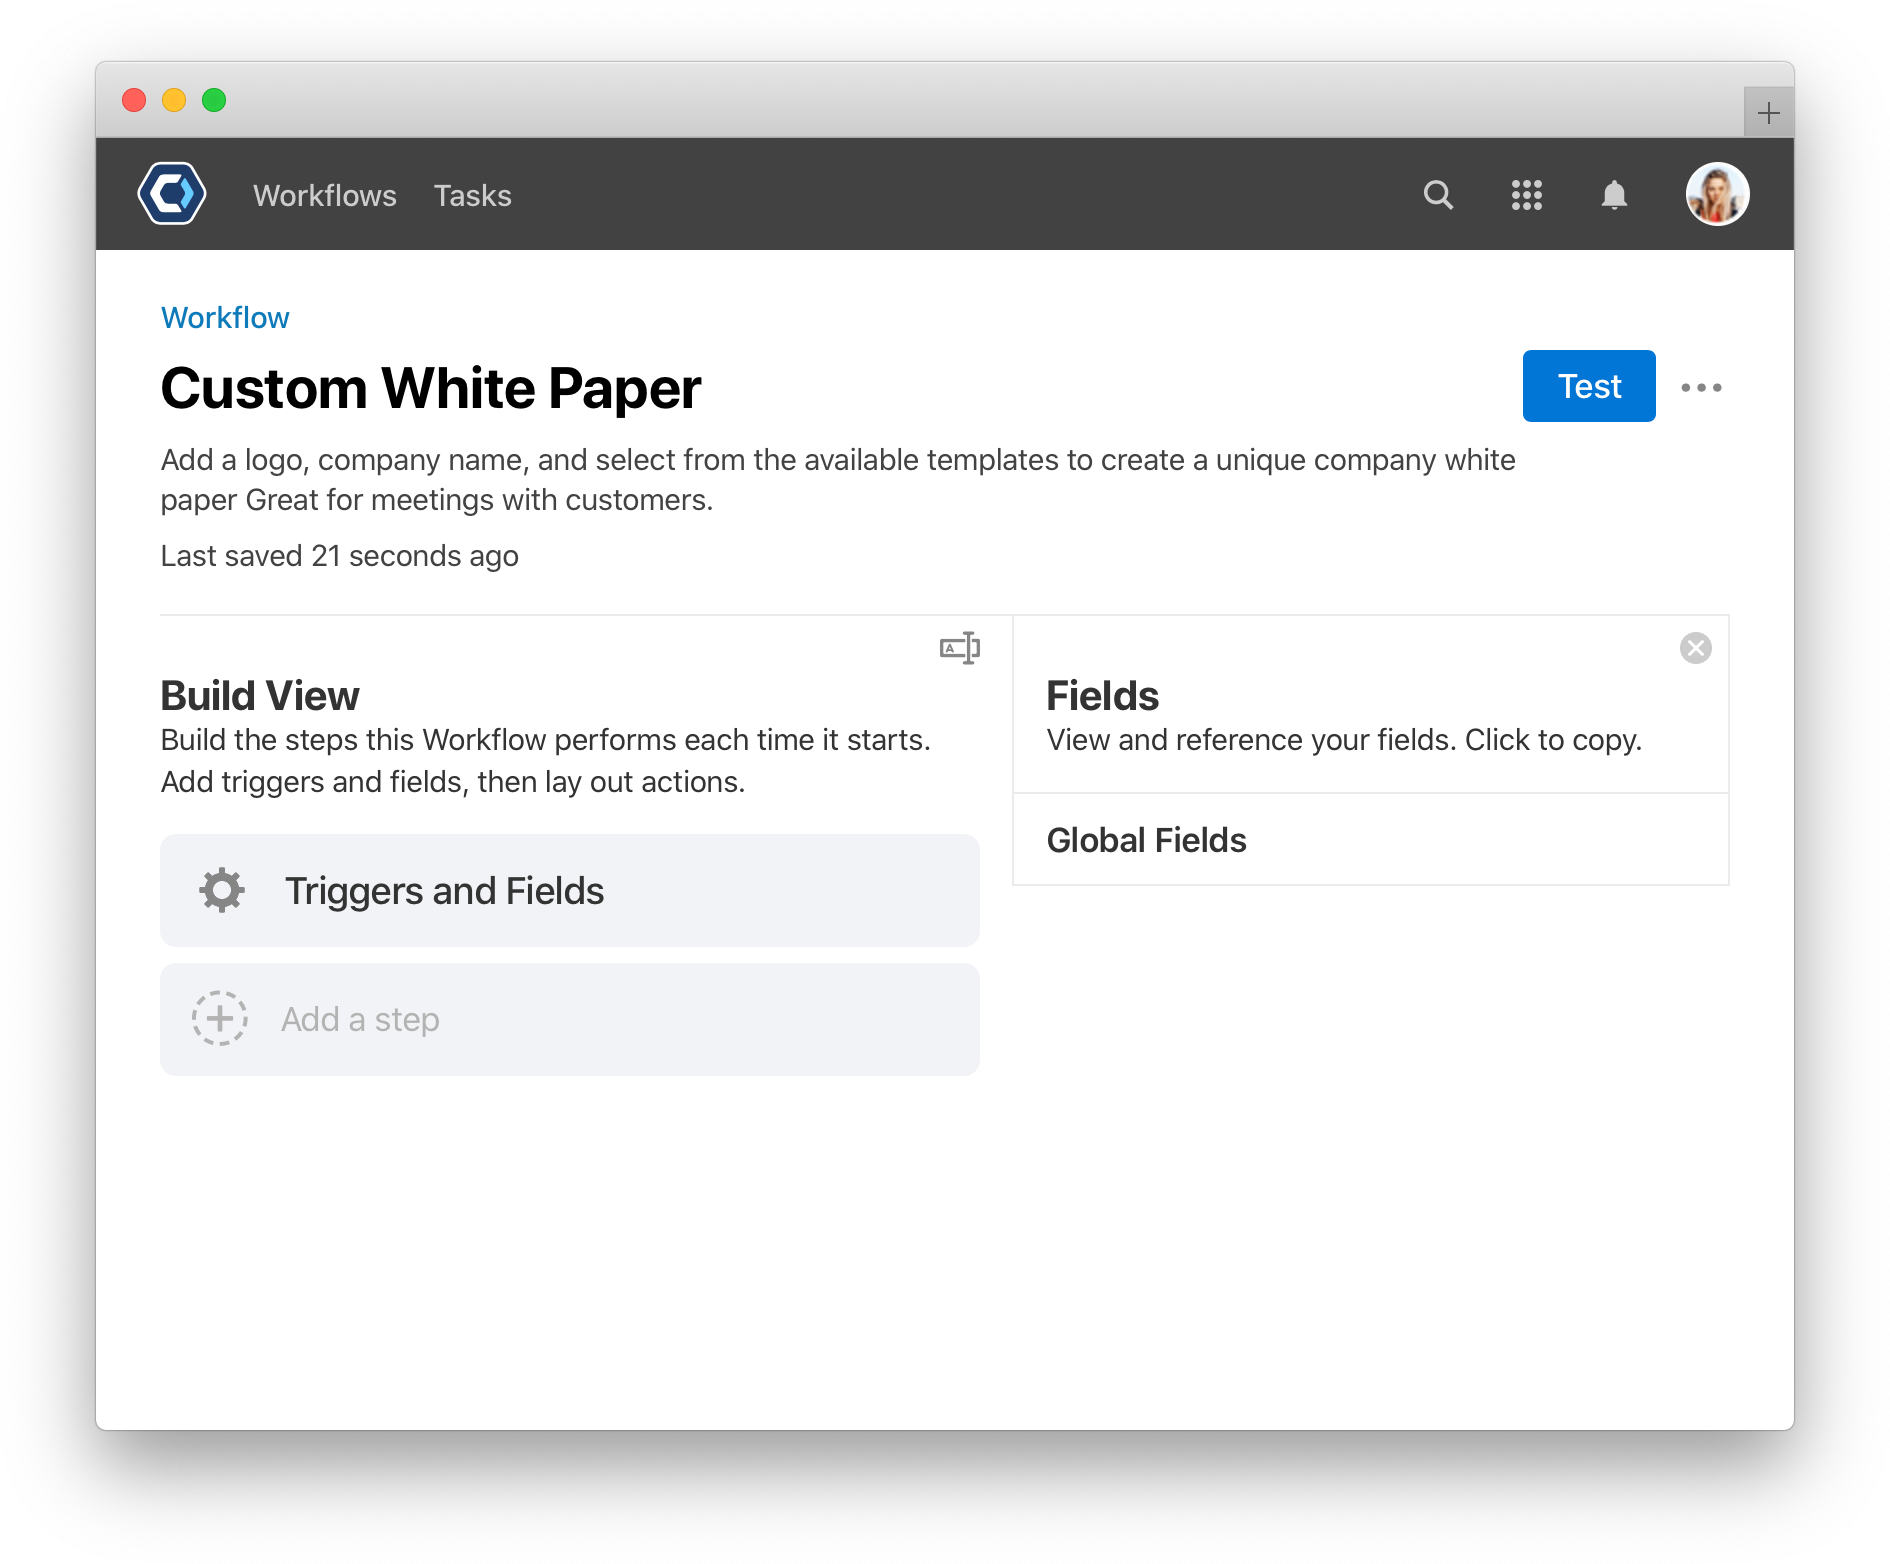
Here’s what this process looks like:

Welcome to the Workflow Builder page! From here, we can add and edit the actions for this Workflow. The actions are the actual steps the Workflow performs.
To change other settings for your Workflow’s, click the  , then select Settings to open the Workflow Settings page.
Add a manual action
Every Workflow follows a series of steps. When you add an action to your process, it is one step the Workflow will act out.
For our custom white paper Workflow, each step—adding a company logo, selecting a template, updating the template—all have equivalent actions.
There are two types of actions:
- Automated actions: Typically require no assistance, and perform steps like adding a row to a table, scanning a PDF for text, or updating a Word file automatically.
- Manual actions: Tasks done manually by a user like you, which use your creativity and insight to support automation; like selecting the correct option, or entering in a reason for something.
Step 2: Navigate to the Build Process page to add an action
After you create a Workflow, you’ll be in Builder, or the Build Screen. From here, actions are added, and the process and process flow is created. On the build screen, actions are arranged in a sequence.
Steps are added one after another, and can be rearranged. By default, when you add new actions, they will start after the previous action is completed or skipped. The order of steps is highly configurable—to create the right sequence of steps, we’ll customize each action with dependencies and conditions later.
For now, treat this page like a checklist where you enter every step in the process. The first step is assigning a manual action to a user to provide some input.
Step 3: Add a manual action
A manual action is assigned to a team member, and it’s up to them to review and complete it for the automation to continue. Manual tasks often include Form Fields for users to add files, enter in text, or make choices. This information is then added to the process and can be used later on. Form Fields are also just called Fields.
There is a lot of flexibility with fields and the information they collect. Here’s an example of what a manual task looks like from the user’s perspective, and how a Form Field is like a question in a survey.
Now we’ll add this manual action, and configure the fields the user fills out. We use the Assign task to a user action for this, which is one of many manual actions.
Add the manual action
- Select Add a step
- Give the action the name:
Select file template and brandingand hit Enter or click Add step - After you add a step, the step opens up and you can configure it.
- Select Assigned to and select your username
- Fill in the details below:
- Instructions:
This process creates a branded file based off a template. Add a logo, select a template, and choose an addressee.
- Instructions:
PagerDuty Workflow Automation tries to match the step name to an action in our action library based on the name. For this step, the system knows it should be an Assign task to a user action.
Here’s what this process looks like:
In a manual task, add Form Fields to add questions or information in the task. This is like adding questions to an online survey. We’ll add a field called Logo or Branding, where users can upload an image for the finished white paper.
Add the first form field to the action
- Select Add a field under form fields, fill in the details below:
- Name:
Logo or Branding - Type: File
- Description:
Upload an image file with a company logo, or the image you want to embed into the document. - Example:
.png, .jpg, or .gif file of any size
- Name:
- Select

Here’s what this process looks like:
Some processes use dozens of these fields, ranging from multiple choice, single choice, or integer fields. For now we’ll add a second field called Company name or addressee, where users supply the recipient the white paper is addressed to.
Add a second form field
- Select Add a field again, fill in the details below:
- Name:
Company name or addressee - Description:
Enter a company name, or addressee. This is the name the file is addressed to, or is used when referring to the recipient. - Enable Required Field
- Name:
- Select
- Scroll to the top of the action configuration and select for the action.
Here’s what this process looks like:
This action is now fully functioning and if we ran the process as is, it would assign you a single manual task with the two form field questions we just added—but it would stop there. We can now take the data we collect and use it as an input for another action. To do that, we’ll first introduce and add Instance Fields.
Add an Instance Field
In the manual action we just added, the user supplies a logo and company name. Instead of also requiring the user to supply the word document template, we can add the word document template as an Instance Field where it’s available in every instance.
Not sure what we mean by “available in every instance”? Another way to look at it is like adding a signature to your email account:
- An email signature is included automatically in every email you send. You set it once, and reference it in future emails.
- An Instance Field is included in every instance that’s started. You set it one, and reference it in future steps.
Instance Fields are great for any frequently referenced information used throughout each instance. You can create an Instance Field with text, integers, files, or other data, and reference it throughout the process.
Step 4: Add the template word file
Here’s a .DOCX file you can use as the template. Basically, we’re going to take the information we collect in the Select file template and branding action you just added, and add it into those {{ }} brackets in the template file. This is called a Field Reference, where we reference data from an earlier field, and reuse it in another place.
Feel free to open it up and check out what’s happening behind the scenes. Don’t change anything in the file (unless you love to break things), as we’ll use this for the rest of the build.
Add and configure the Instance Field
- From the top of the builder screen, click to open the Triggers and Fields section.
- Select Add a field in the Instance Field section.
- Fill in the details below:
- Display Name:
Marketing Template - Field Reference Name: This field will populate automatically based on the display name. We’ll keep it as is.
- Type: File
- Default: Select this field then choose Browse Files, find the
whitepapertemplate1.docxfile you downloaded earlier and add it. Here’s another link to download the template just in case: whitepapertemplate1.docx
- Display Name:
- Scroll to the top and select
Here’s what this process looks like:
Now that a template file is added, we can add an action to populate the template with the answers to the form field questions in the first step. To do this, we’ll enter in some field references. A field reference is a way to reuse data in new locations.
Add an automated action
Earlier in the Workflow, we added a step where a user can enter some text in the Company name or addressee field. The text they enter can be referenced by the field’s Field reference name, which is {{company-name-or-addressee}} in this case.
Here’s a scenario that demonstrates field references: If we want to customize an email subject line with the recipients name. To do this, In one task we collect a user’s first and last name in a Full Name field (For example, “Varun Anand”), in an email task later we reference that field by the field reference name, {{full-name}}. We could write the subject line as “Hey there, {{full-name}}!”, and it would show up to the recipient as:
Hey there, Varun Anand!
If you ever enter a field reference name into another field, email, or anywhere else in PagerDuty Workflow Automation, it will substitute the reference for whatever value is in the field.
As processes get larger, there are more and more fields to reference. You can type {{ in a textbox where field references are supported to display the field reference picker. With the picker open, start typing to filter the available fields. You can use the arrow and enter keys to select from the choices, or your mouse.
Step 5: Add an action to fill out a word file template
We’ll use the Word: Create a Word Document action to create the unique white paper. We will reference the template file we added as an Instance Field with a field reference. We’ll also add a field reference within the new file name, so every .DOCX file has a unique title, like Catalytic-08-19-2019.DOCX.
Add the first automated action
Let’s add our second, automated action directly after our first manual action.
- Select Add a step at the bottom of the page.
- Give the action the name:
Fill out word templateand hit Enter or click Add step. - Fill in the details below:
- File template:
{{marketing-template}} - Format:
DOCX - New file name:
{{company-name-or-addressee}} - {{run.startDate}} - Output field name:
brandedfile
- File template:
- Select at the top of the action.
Notice the unique field reference {{run.startDate}} added to the new file name. This is not a field we added to the process ourselves—it is included by default in every process. This is a Global Field, which contain unique information about each instance. Other examples are, Run Percent Complete or Run Owner Email.
💡 Tip: Want to see more Global Fields? Check out the Field Sidebar on the right hand side of the Builder screen. You can click the ![]() icon to open and close it. This panel lists every field you can reference, broken down by each step. For example, you can click to expand the Global Fields section and see all available Global Fields—then just click to copy one, then paste it into an action.
icon to open and close it. This panel lists every field you can reference, broken down by each step. For example, you can click to expand the Global Fields section and see all available Global Fields—then just click to copy one, then paste it into an action.
Here’s what this process looks like:
Test the process
You can test a Workflow at any time, and by doing so regularly, you can spot and fix problems while you’re building. A lot of builders say they test their Workflow every time they configure a new task; we recommend that!
When you test the Workflow, you’re able to quickly and privately see how your configuration is working without making any changes or edits to the team or workplace.
Test the process so far
- From the top of the Workflow Builder page, select

- From here, you can configure how the test is run. Leave it as is, and select the
 button.
 - The instance will begin, and you will redirect to it. Scroll down to see the assigned and pending tasks.
- Select the assigned task to complete it (it has a yellow “assigned” label on the right), and it will open up. Add any image or company name you’d like to test, then select
 at the top of the task.
 - After you complete the task, it will minimize and you should see the instance again.
- After you finished your task, the next task, Fill out word template action will have already completed automatically. It may not be visible based on your filters—change the status filter to “Any Status” to see both completed tasks.
Here’s what this process looks like:
Check every output field from a process
As well as testing a process to make sure it’s working, builders regularly check the fields page to see every output from the Workflow. You can access this in any instance from the instance detail page.
- From the top of an instance page, select the top right 3 dot menu.
- Select Fields
Every field added manually, or output from an action is recorded on this list. This is a very useful page to review.
Here’s what this process looks like:
Link more actions together
After testing the 2 steps we’ve added, let’s add a 3rd and set up more dependencies.
Dependencies determine the order that steps are executed within a Workflow. By default, actions complete sequentially based on their order on the Builder page. But you can set each step’s dependencies and conditions manually to customize and determine the flow or order of the process.
Link actions together with dependencies and conditions
So far, we’ve set up one dependency already using the default settings! We set the Select file template and branding action to happen second by setting it directly after the Fill out word template action. We used the default Start after previous step is completed or skipped dependency.
You can also set up more complex dependencies—this is how we configure each task to begin at the right time. There are three additional, more complex dependencies we’ll look at next.
But first, let’s look at an example 6-step flowchart to look closer at how dependencies and conditions differ:

Let’s just look at A, B1, and B2 to understand the difference between dependencies and conditions.
Dependencies define the order of actions, while conditions define the logic. For example:

The colors illustrate conditions, which are set up like IF/THEN statements: in one condition, B1 should start, and in another, B2. For example: If a field is not empty, start B1, if the field is empty, start B2
The dependencies set which steps happen before others, but don’t say when to start B1 or B2 instead of the other. So B1 and B2 need dependencies and conditions. There are three complex types of dependencies:
- All must be completed: All selected steps must be completed before the next task will begin, for example: If any of the selected steps are skipped, then this task will also be skipped.
- At least one must be completed: Any one of the selected steps must be completed before the next task will begin. If all of the selected steps are skipped, then this task will also be skipped.
- All must be completed or skipped: All of the selected steps must be resolved in some way (either completed or skipped).
Here’s an animation using the 6 step example process to show some of the dependency types.
Together, dependencies and conditions help set up the flow of a Workflow.
We’re going to add a 3rd action that will resize the logo we upload, then we’ll update the dependencies and conditions so everything happens in order.
Step 6: Add an images: resize image action
- Select Add a step at the bottom of the page.
- Give the action the name:
Resize the logo imageand hit Enter or click Add step. - Fill in the details below:
- Image file:
{{logo-or-branding}} - Height:
200 - Output field prefix:
logo or branding
- Image file:
- Select at the top of the action.
Here’s what this process looks like:
PagerDuty Workflow Automation fields can only have 1 value at a time. In the first task we created we already added a field named logo or branding where a user uploads the initial image. Once the resize image task runs, it saves the resized file to the same field, overwriting the original. We could have also used a different output field, and not overwritten the logo or branding field.
Step 7: Add dependencies and conditions
Now that we have three actions, we’ll configure the Resize the logo image action to start after a user uploads a logo, but only if a logo image was supplied. We want it to happen 2nd. We’ll add 1 dependency to indicate the task begins after Select file template and branding, then add a condition so if no logo is uploaded, the task is skipped.
Changing the dependencies for our new task is easy: just click, hold, drag, and drop it into the 2nd position.
-
Click, hold, drag, and drop the Resize the logo image task from the 3rd position, into the 2nd position. The dependencies will update automatically!

- Click the Resize the logo image action to open the configuration.
- At the bottom, select Add a Condition
- Select the blank field after
if, selectFieldthen in the next blank field, selectLogo or Branding - Select the operator and select
is not empty.
- Select the blank field after
- Select
 and then select
Here’s what this process looks like:
Step 8: Update step dependencies and conditions
With the tasks in order, they will start one after another. But since the Resize the logo image action only starts conditionally, let’s update the 3rd step so it starts if the first two steps are completed or skipped.
- Select Fill out word template action to open the configuration.
- At the bottom, in the Dependencies & Conditions section, select the dropdown after previous step is completed or skipped and change it to when dependencies are met.
- Select All must be completed, and change it to All must be completed or skipped
- In the Select one or more steps… section, select both Select file template and branding and Resize the logo image
- Select at the top of the action.
Wrapping up
At this point, the process is completed and ready for use. To summarize the process flow:
- A manual action is assigned to the owner. In the task, the user submits a logo and company name.
- If the user submits a logo, the logo is resized. If no logo is added, the resize action is skipped.
- Whether or not the logo is resized, an automated action references the previously entered data and fills in a template word document.

The process can now be started manually. After wrapping up the build, start an instance to make sure everything works.
Start an instance
- From the Workflow Builder screen, navigate back to the Workflow Details page using the breadcrumbs in the top left. It should say Back to Workflow.
- Select
 . Leave the name, deadline, and other fields as is.
 - The instance begins and you’re redirected to the detail page for the new instance. The first task is assigned to you, which you can access below, or from the Tasks page on the top navigation.
Here’s what this process looks like:
Overview of introduced topics
In this guide, we covered the following Workflow building basics. Click any of the links below to read more about that topic.
- Create a Workflow, and add the individual steps it will run.
- Configure a manual task, Assign Task to a Person.
- Configure the automated tasks, Word: Create a Word Document and Images: Resize an Image.
- Set up simple logic using dependencies and conditions to make sure the actions happen at the right time.
- Use field references to reference data we collected, and then used the references to dynamically populate a Word document and configure other actions.
- Create 2 form fields, and 1 Instance Field.
- Test the Workflow, and check the field list for an instance.
Next steps
This process is a great starting point to now explore and add a trigger, or add an email action to send the populated template to someone. A trigger is a way to automate how your Workflow starts. Right now, this process has to be started manually, since there’s no trigger configured.
To begin, try adding a web form trigger to the process.
Set up a web form trigger
A Web form trigger starts a Workflow when a web form is submitted. When a web form is submitted, all entries are available as fields in the process. Web forms can also be publicly accessible, so you can loop customers, partners, or vendors into your automation.
Explore the help center’s triggers and web form triggers pages to learn more on triggers.
Right now, the process is started manually and the logo and company name is collected with a manual action. If you add a trigger, the first thing to do is to replace the manual task with a web form so any time someone fills the form out, the image is resized, and the white paper is created. This further automates the process.
Check the help center regularly
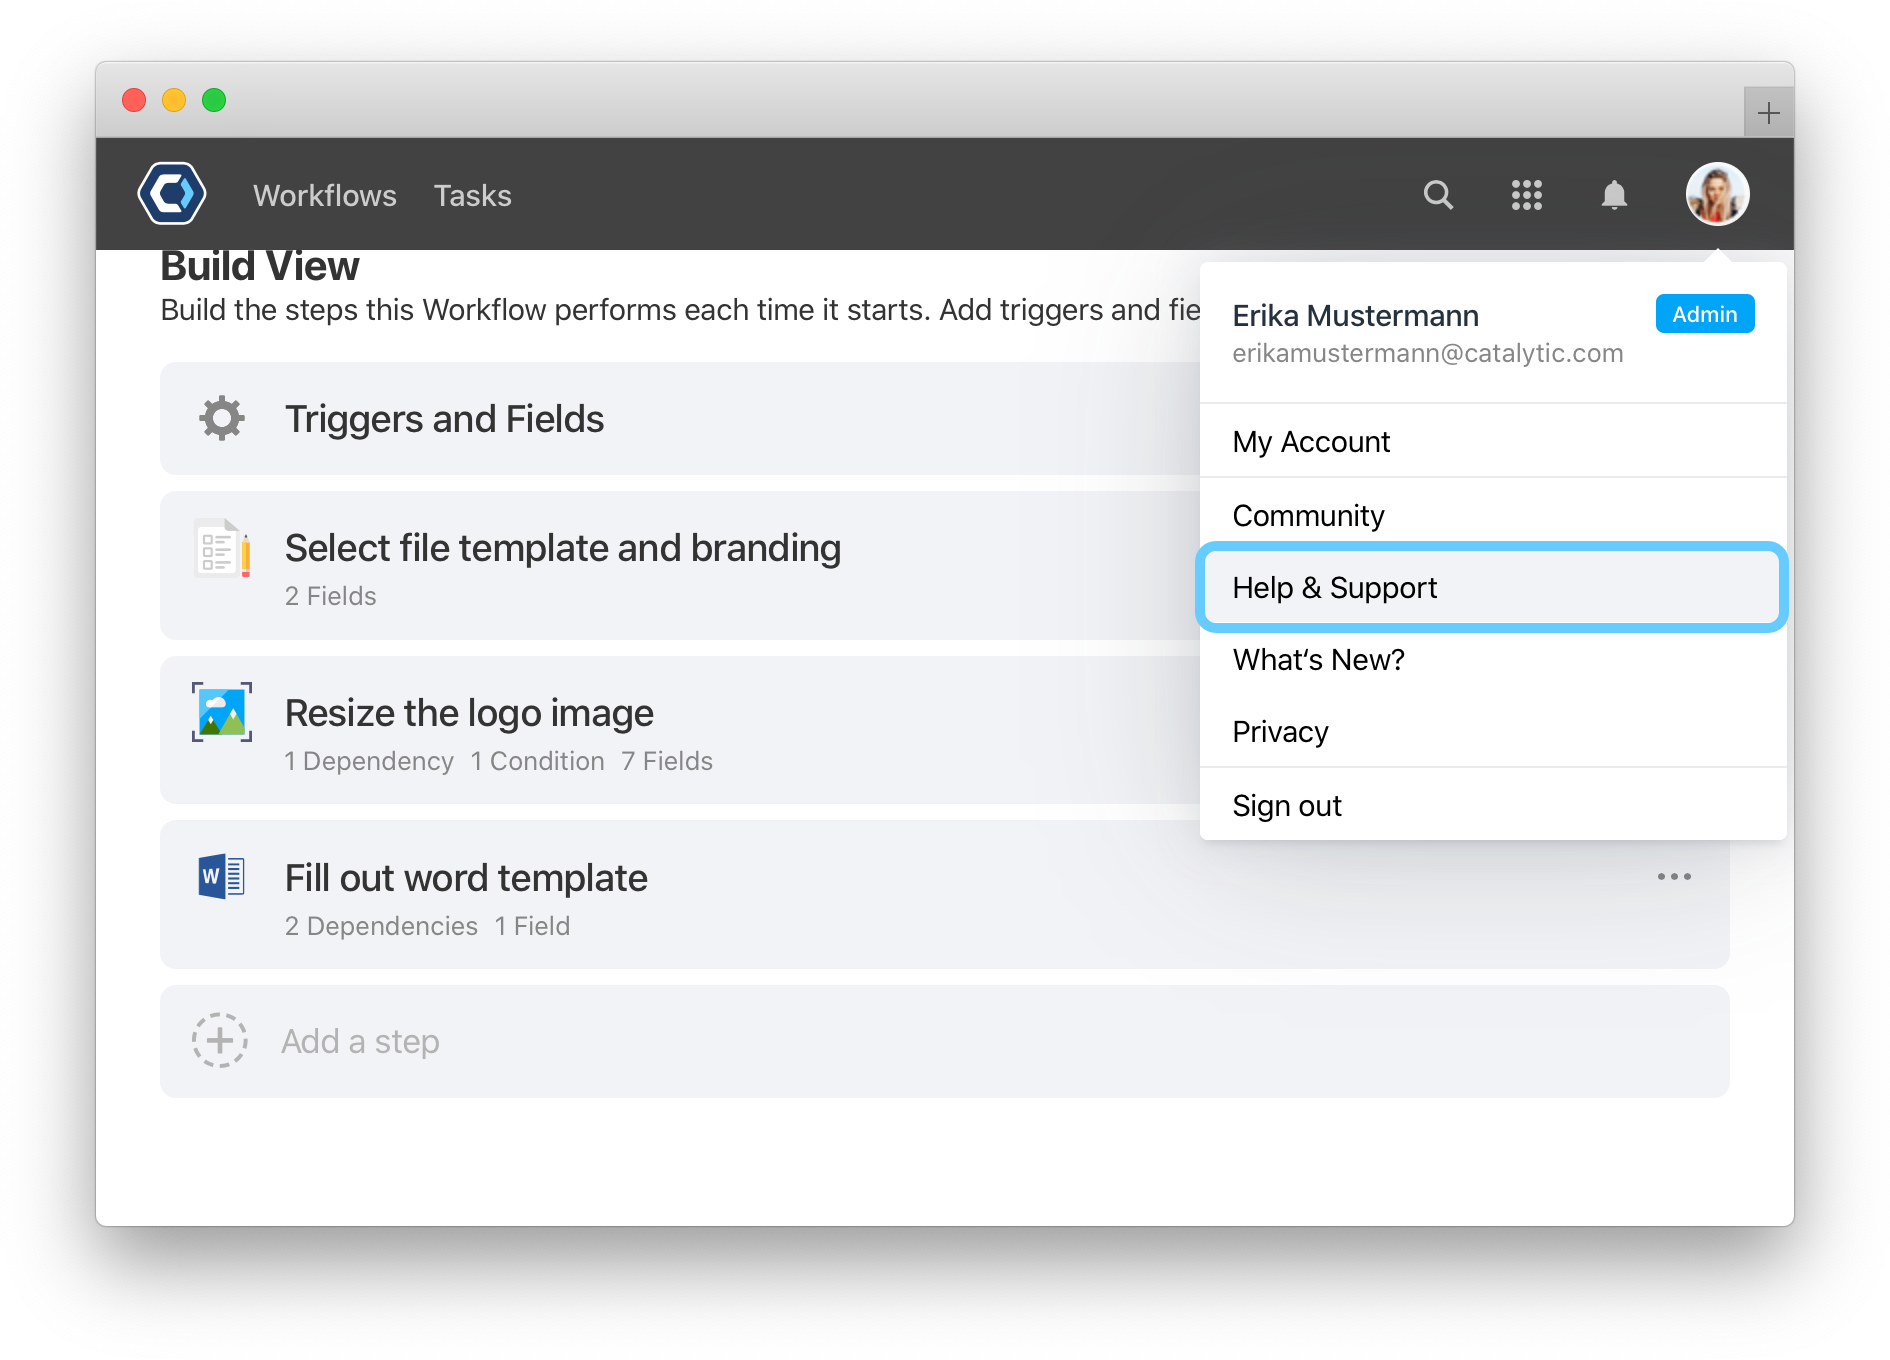
For more information on building or working in PagerDuty Workflow Automation, use the Help Center (you’re there now) to find answers, get step-by-step instructions, or review the specifics of different automation concepts.
You can always get back to help quickly anywhere in PagerDuty Workflow Automation: help is always available from the menu in the top right of any screen.
Thanks for your feedback
We update the Help Center daily, so expect changes soon.
Link Copied
Paste this URL anywhere to link straight to the section.