Create a web form and route inquiries
Web forms are a great way to loop people into a Workflow instance. Since a web form is a publicly accessible link, customers, partners, or vendors can get involved in automation.
Introduction 
Web forms look like a questionnaire and collect information from people for a Workflow instance. Because a web form is a publicly accessible web page with a form built in, you can loop customers, partners, or vendors into your automation. When a web form is submitted, all entries are available as fields in the process.
This makes web forms a great way to start automation. A good first process to illustrate the capability is with a webform where users can submit inquiries, and then those inquiries are routed to different PagerDuty Workflow Automation users.
Web forms are either sent in an action, like the Email: Send a Form action or can be a trigger to start a new Workflow with a Web form trigger. In both cases, the form answers are turned into fields.
When a web form trigger is completed, the trigger initiates an instance of that Workflow using the information entered into the form. This is often used as an intake mechanism for requests, tickets, or issues that can then be addressed through a Workflow. In this guide, we’ll set up a web form to route inquiries to different departments.
How a web form trigger works
With a web form trigger, the web form is hosted on a publicly accessible link, like example-team.pushbot.com/form/submit-new-claim-trigger, and any time it’s submitted, an associated Workflow starts.

With a web form trigger, each submitted web form starts a Workflow instance. In this example, when the form is filled and submitted, a Workflow begins. The Workflow uses the field data to create a dynamic PDF. The PDF is then uploaded online and sent over email.
Create a Workflow
Let’s build that process we talked about earlier—routing a webform submission to the correct department.
Step 1. Create a new Workflow
We’ll start off by creating the Workflow that will automate this process. We’ll give it a name and description, then jump in and start configuring it.
- From your PagerDuty Workflow Automation home screen, select Workflows in the top navigation bar.
- Click on
 on the top right of the screen.
 - Select Blank Template
- Set up the Workflow as follows:
- Name:
Route inquiries to departments - Description:
This process waits for webform submissions, then directs the submissions to the appropriate department - Leave category and owner as is.
- Name:
- Select the Configure this Workflow button.
The Workflow Settings page is the command center for each Workflow. From here, you can access all the settings, actions, and tools you need to manage a Workflow.
Create a Web Form Trigger
Creating a web form trigger has two steps: First, create the web form trigger. Then after the web form trigger is created, add Form Fields to the web form, which are are like questions in a survey.
Step 2. Add a web form trigger
After Step 1, you are in Builder. Now we can set up the the actions for this Workflow. The actions are the actual steps the Workflow performs. We also add our triggers from this page, in the Triggers and Fields section below.
-
Head to your triggers under the Triggers & Fields section.
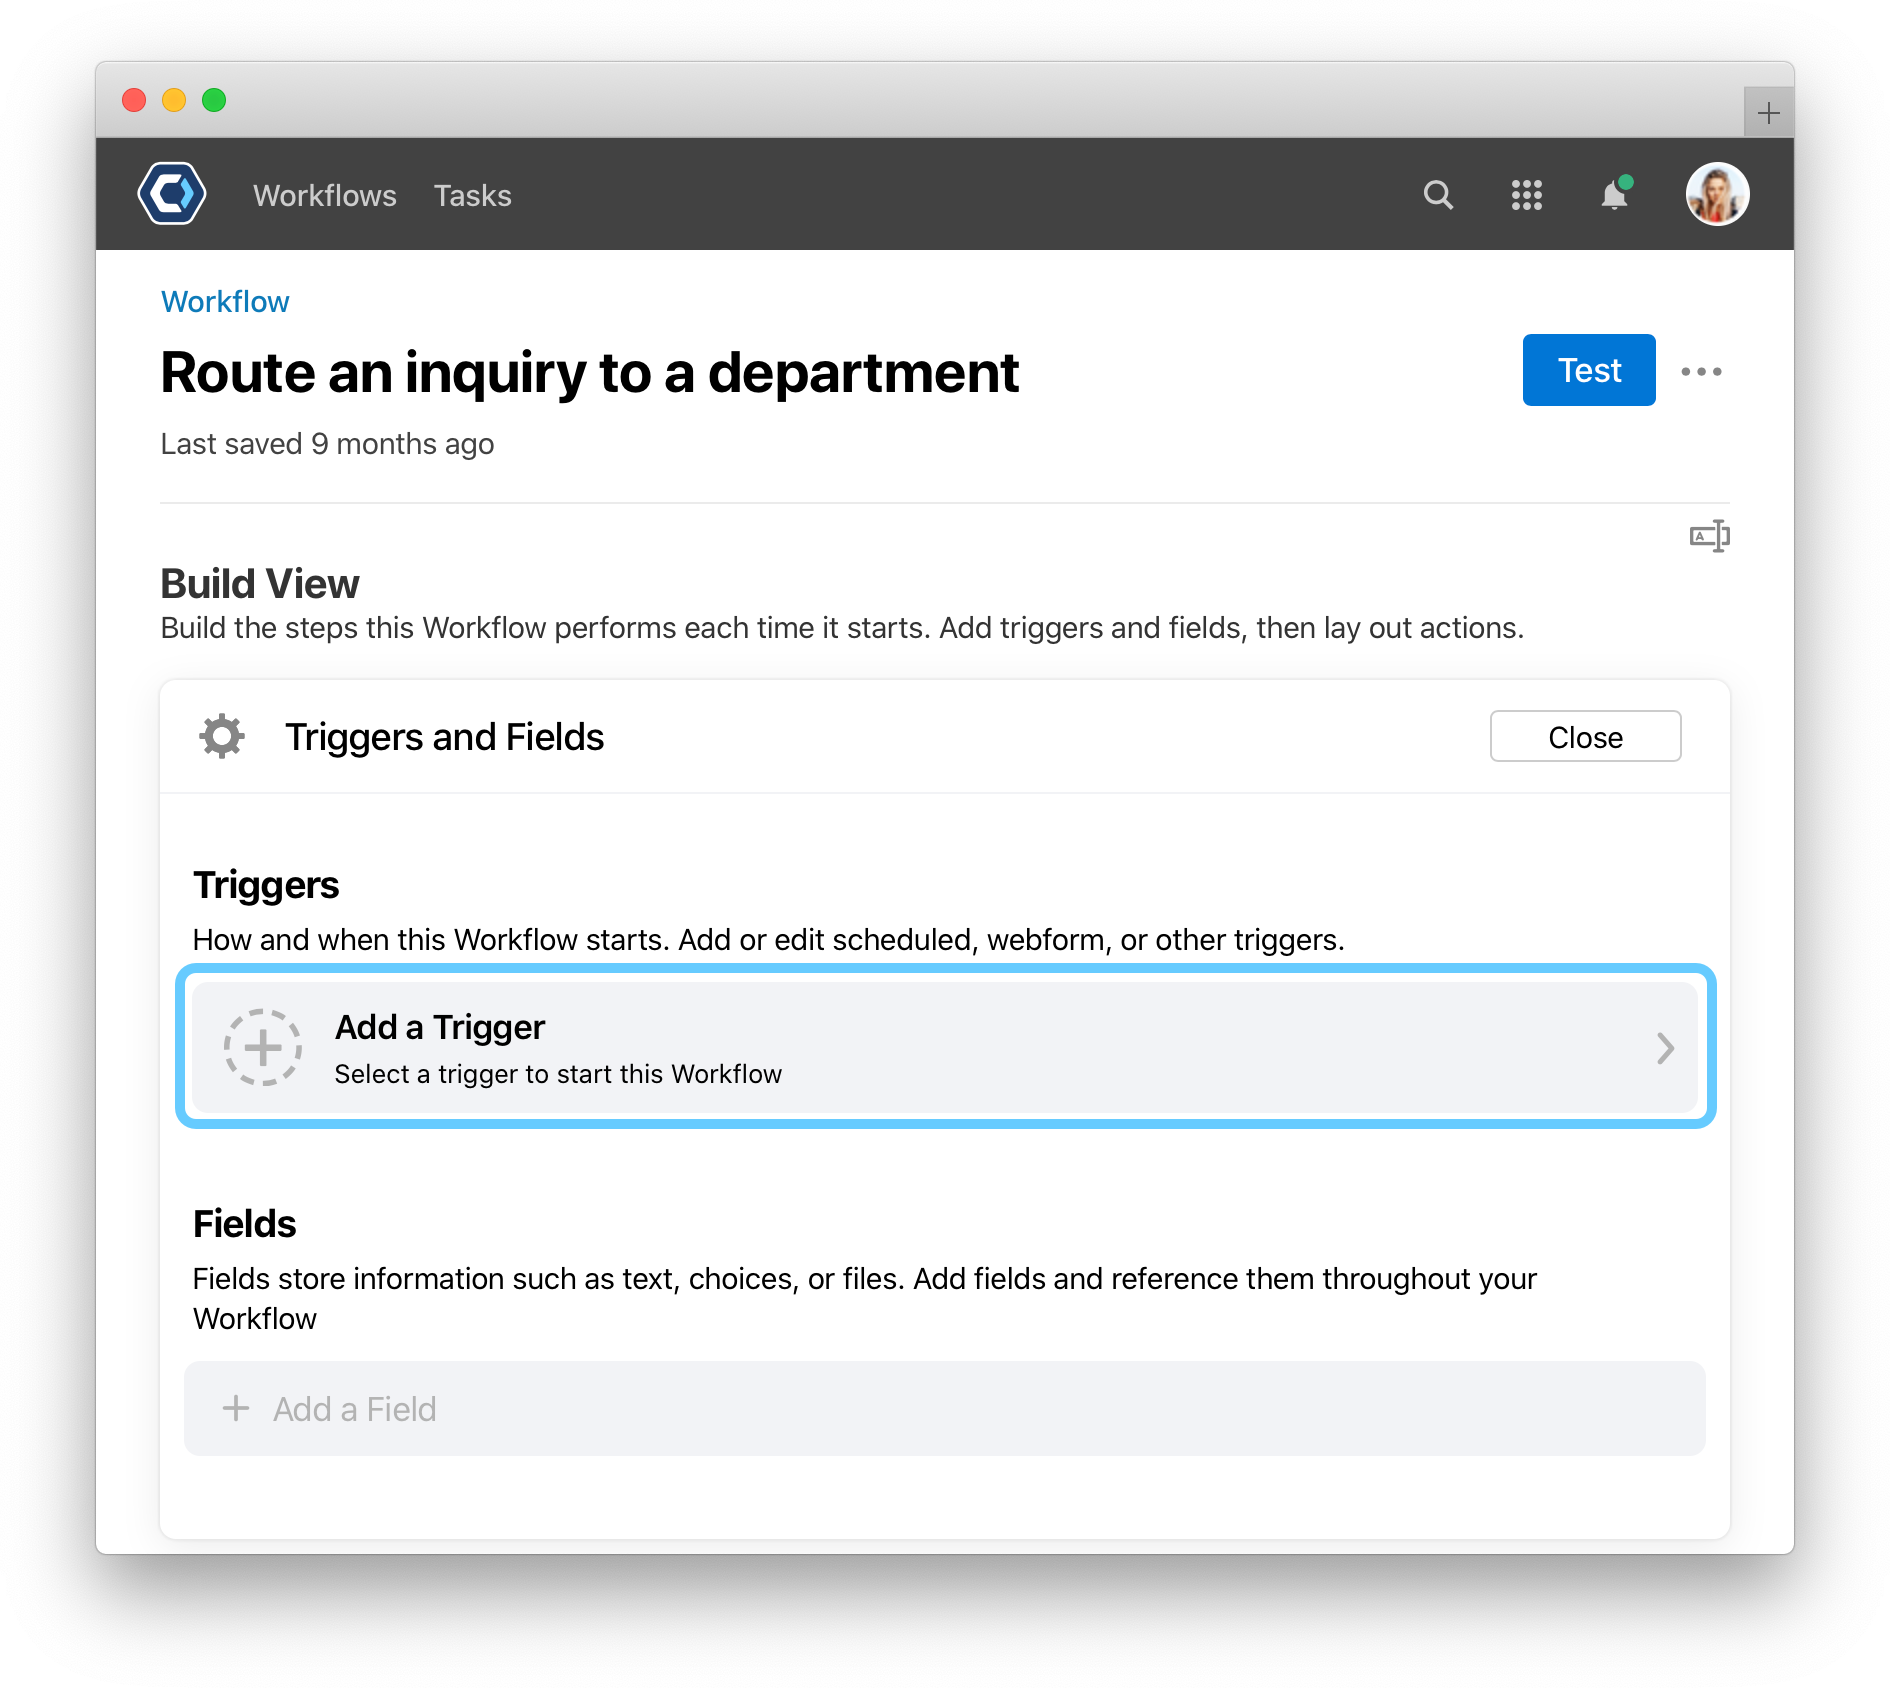
- Select Add a Trigger. This opens the Select trigger type screen.
-
Select the Web Form type trigger. This opens the Create Web Form Trigger screen, where you enter in the trigger details. These can all be changed later to better suit your use case:
- Trigger name:
Route webform inquiries - Form title:
Departmental inquiry - Form instructions:
Please select the department you wish to contact, and include a description of your request. Please select the correct department to help route inquiries.
- Trigger name:
- Select

Step 3. Add and configure fields for the trigger
You can add fields to a web form trigger from the Triggers and Fields section. Any field added to the Form Fields section is added to the web form. These fields appear like questions or instructions on a survey.
- From the Workflow Builder screen, select the Trigger and Fields section to open it.
- Select Add a Field in the Form Fields section. These fields become questions on the web form.
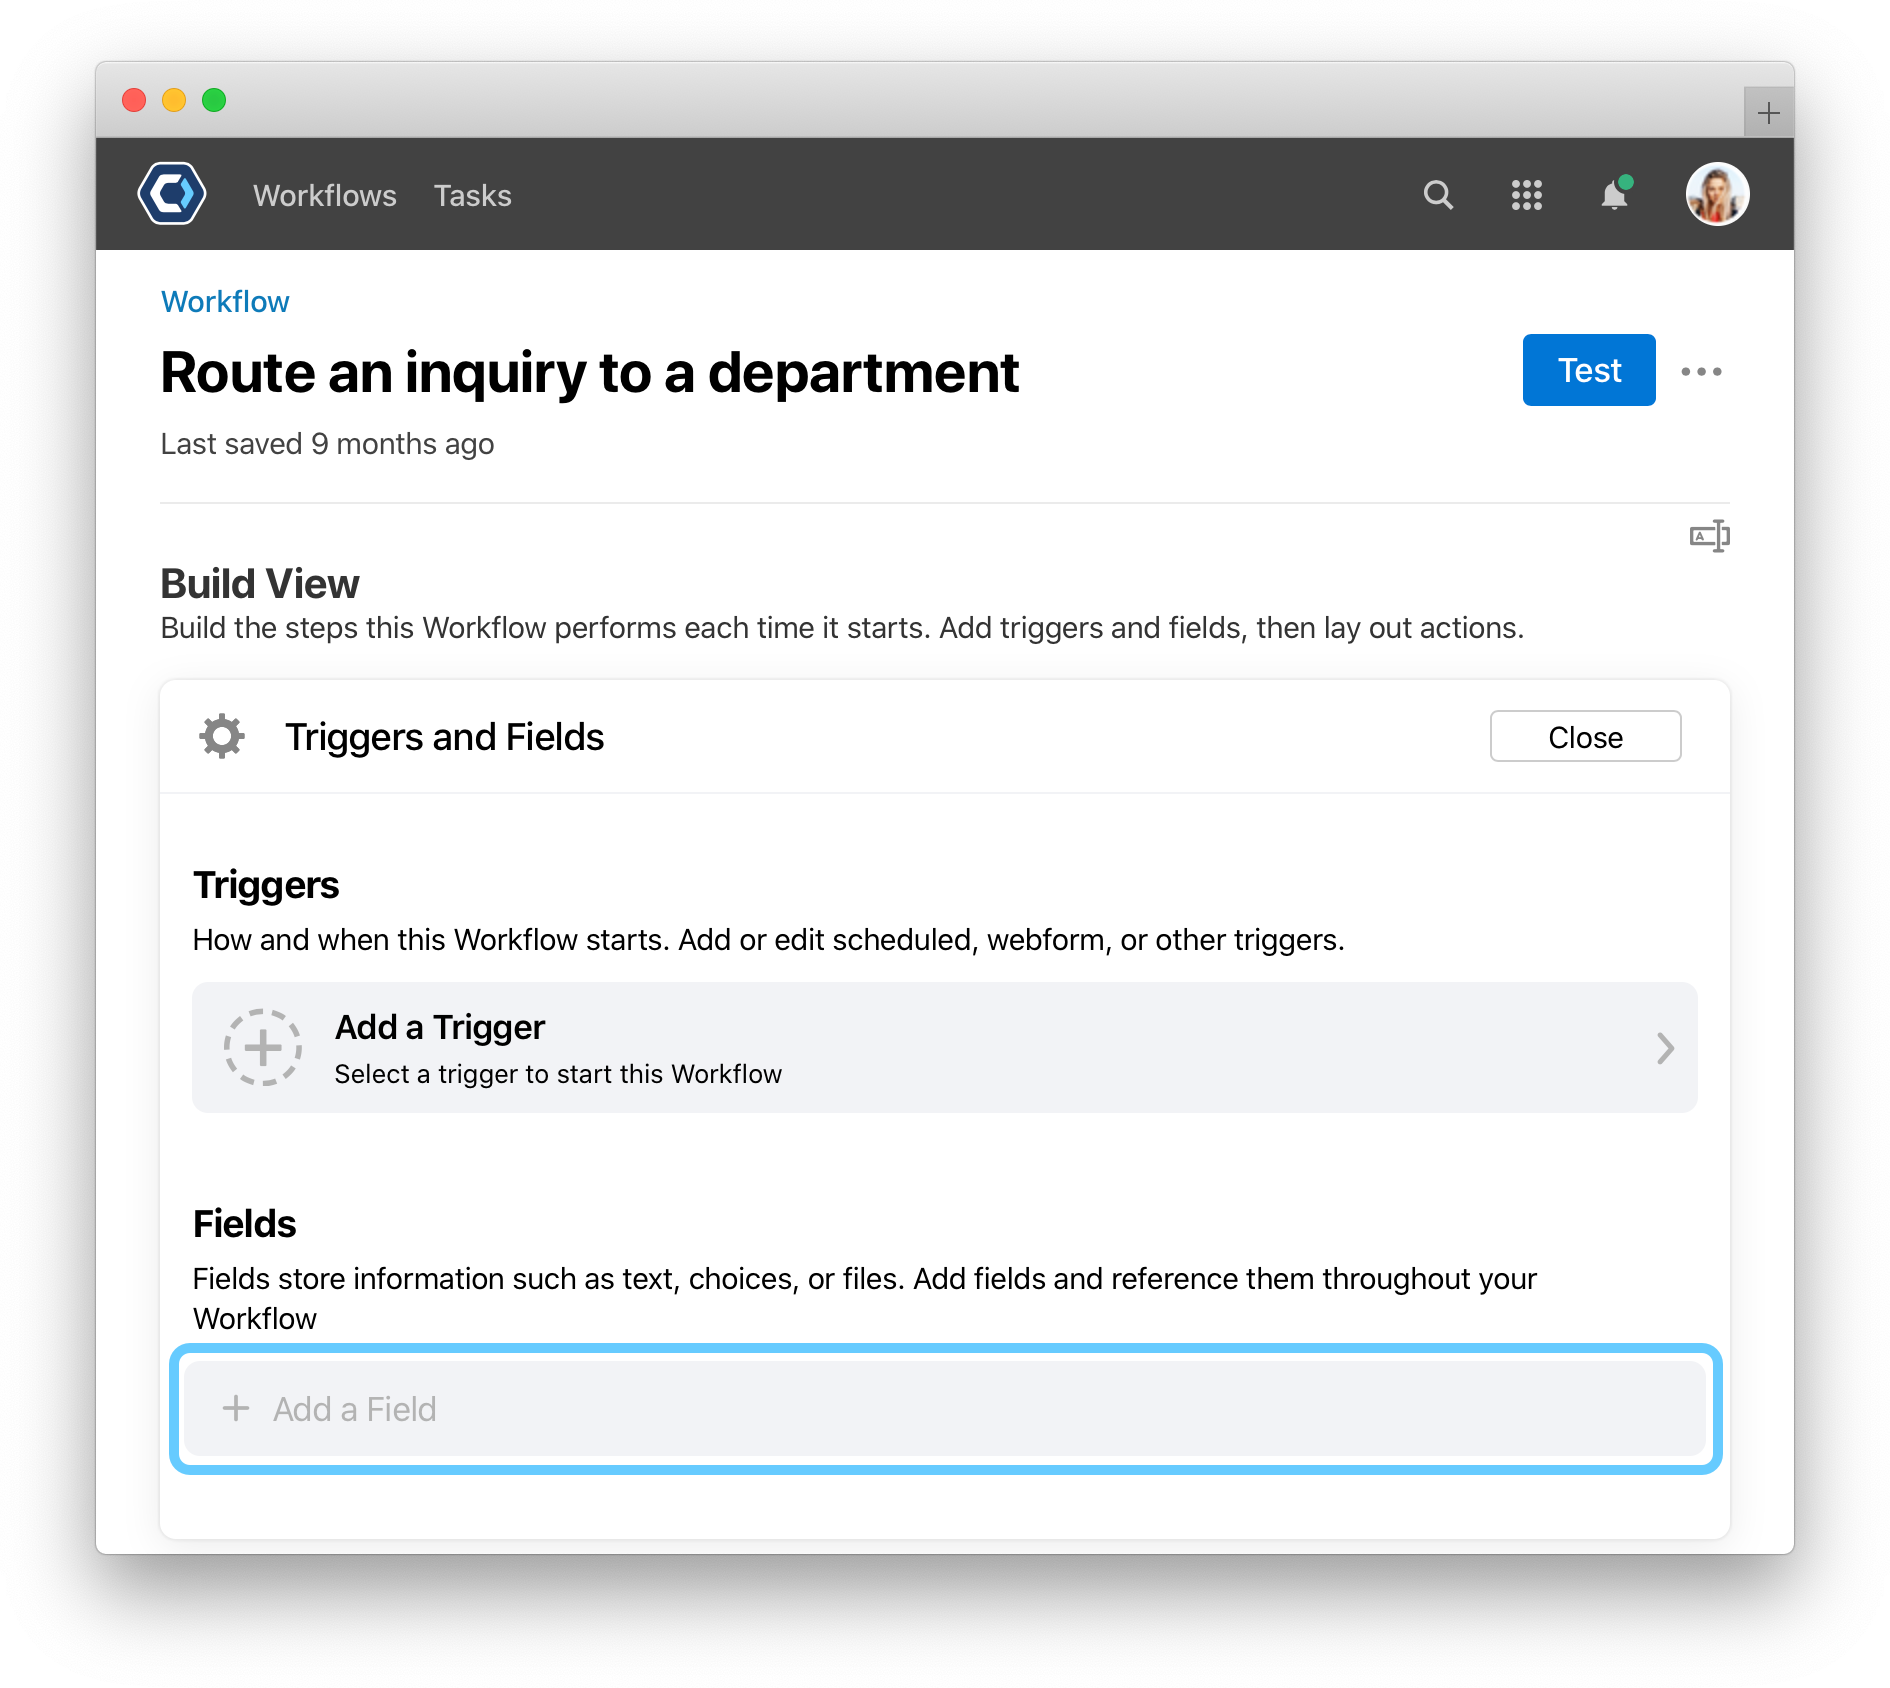
- For this example, we’ll add a text field and a single choice field. Fill in the details below:
- First field: Choose a department field
- Display Name:
Department - Field Reference Name: This field will populate automatically based on the display name. We’ll keep it as is.
- Type: Single Choice
- Options:
EngineeringandFinance - Description:
Select your department. This will help route your request to the correct representative. - Required Field: Enabled - Scroll to the top and select Save
- Display Name:
- Second field: Enter a request field
- Display Name:
Request - Type: Text
- Description:
Enter your request, using 1-2 sentences. Please be sure to include any relevant information like dates or times. - Required Field: Enabled
- Display Name:
- Scroll to the top and select Save
- First field: Choose a department field
Add actions to route the tasks
We can now set up manual actions that handle routing the web form request to the correct department. We’re going to create two “Assigner” tasks that will assign a manual task based on which department is chosen in the web form.
In this example, we’re setting the follow up tasks as a manual task, but it’s just as easy to send an email, post something on Slack, or start any other automated action based on the department instead. Use this as a starting point for your own automation!
Step 4. Add an action for each department
In the last step, we added fields to our web form trigger. Below the Triggers and Fields section is where we can add each of our manual tasks. We’ll add two actions, one for each department.
Add the action for the engineering department
- Select Add a step
- Give the step the name:
Assign to Engineering departmentand hit Enter or click Add Step - After creating the step, the step expands and you can configure it. The step is automatically set to the Assign task to a person action.
- In the Assigned to field, you would set the user who should receive the task. While you’re building and testing, you can select your own username. If you have someone in mind already, add them here.
- Fill in the details below:
- Instructions:
There was an incoming request on the departmental webform. See the attached message below.
- Instructions:
In a manual task, add Form Fields to add questions or information in the task. This is just like how we added tasks to a web form earlier. We’ll add a single choice field for “Approved” or “Denied” so we can configure some optional next steps after the department representative has reviewed the inquiry.
Add a form field to the action
- With the configuration still over, select Add a field under the Form Fields section, fill in the details below:
- Name:
Approve? - Field Reference Name:
engineering-approval - Type: Single Choice
- Options:
ApprovedandDenied - Description:
Please choose to approve or deny the request. An approved request will begin a separate process. - Required field: Enabled
- Name:
- Select

Add the action for the finance department
Now let’s make one more of these assigner tasks that route the inquiries to different departments. Follow the exact same steps above, but change the action name to Assign to Finance department and the field reference names to finance-approval.
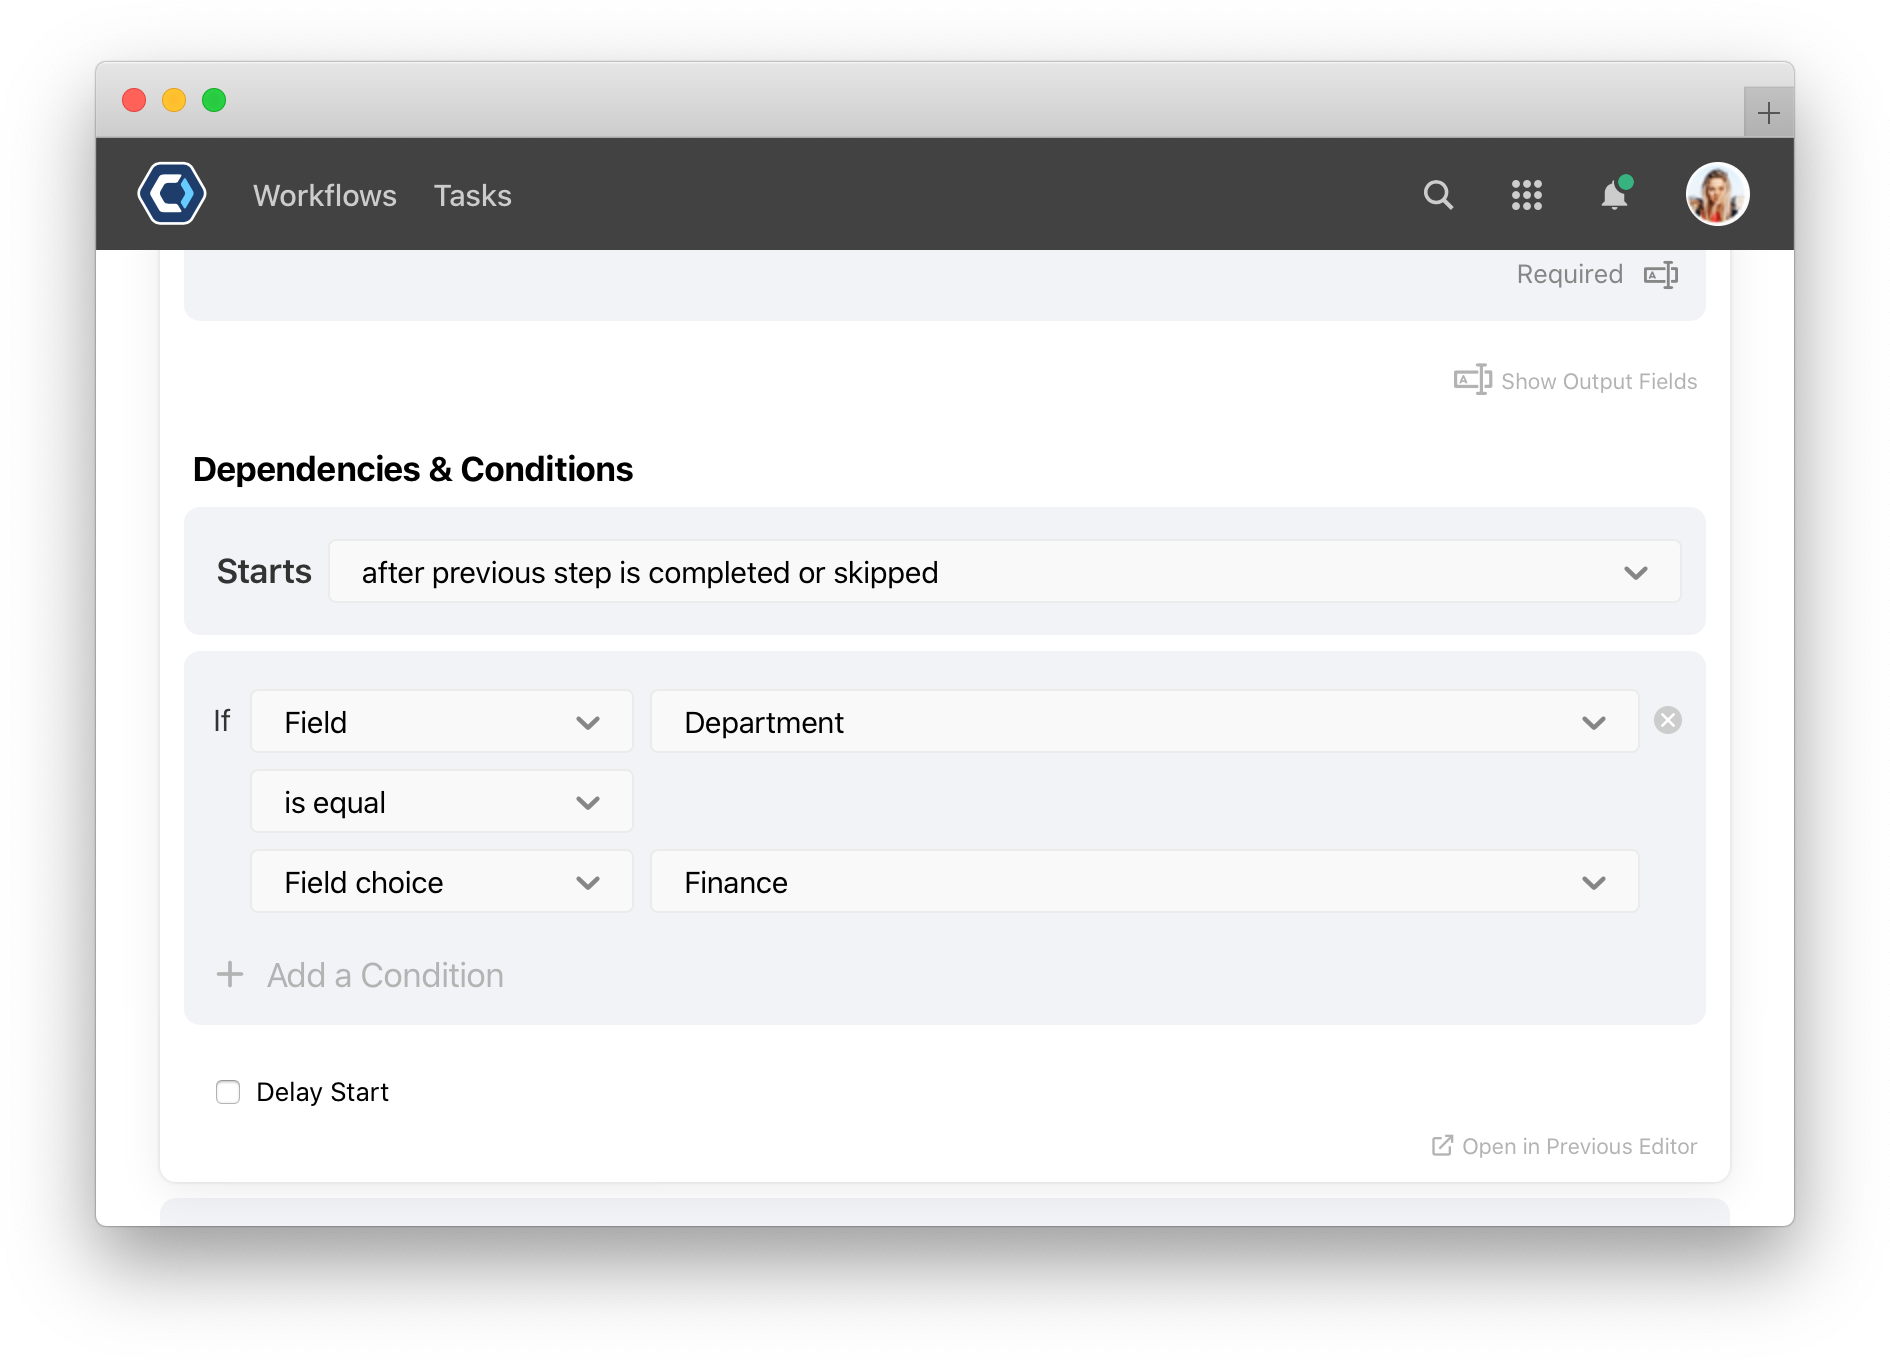
Until we set dependencies or conditions, every action would start at the same time—it’d be a mess! Dependencies and conditions are the ways we configure each task to begin at the right time.
Add conditions
For this process, we need to set up conditions so only 1 of the actions happens depending on which department field is chosen. Conditions are like IF/THEN statements—”If A, then B happens”

We’ll add 1 condition to each action, each action will have a similar but unique condition:
- The finance starter’s condition is: “If the department is finance, then start this task.”
- The engineering starter’s condition is: “If the department is engineering, then start this task.”
Step 5. Add conditions for each action
Add conditions for the engineering department
- From the actions section, select configure on the
Assign to Engineering departmenttask. - At the bottom of the configuration, select Add a Condition.
- Select the blank field after
if, selectFieldthen in the next blank field, selectDepartment. - Leave the next field
is equalas is. - Select the next blank field, and make sure it is set to
Field choice. In the next field, selectEngineering.

- Select the blank field after
- Select at the top of the action.
Add conditions for the finance department
Now do the same thing for the finance department task.
- From the actions section, select configure on the
Assign to Finance departmenttask. - At the bottom of the configuration, select Add a Condition.
- Select the blank field after
if, selectFieldthen in the next blank field, selectDepartment. - Leave the next field
is equalas is. - Select the next blank field, and make sure it is set to
Field choice. In the next field, selectFinance.
- Select the blank field after
- Select at the top of the action.
Test the routing process
You can test a Workflow at any time, and by doing so regularly, you can spot and fix problems while you’re building. A lot of builders say they test their Workflow every time they configure a new task; we recommend that!
When you test the Workflow, you’re able to quickly and privately see how your configuration is working without making any changes or edits to the team or workplace.
How to share a web form
Web forms are either hosted on a publicly accessible link, like example-team.pushbot.com/form/submit-a-new-claim-trigger, or can be embedded straight into a web page.
To get started sharing a web form, select  at the top of the Workflow Settings page for the Workflow whose web form trigger you’d like to share. You can only share web forms after adding a web form trigger.
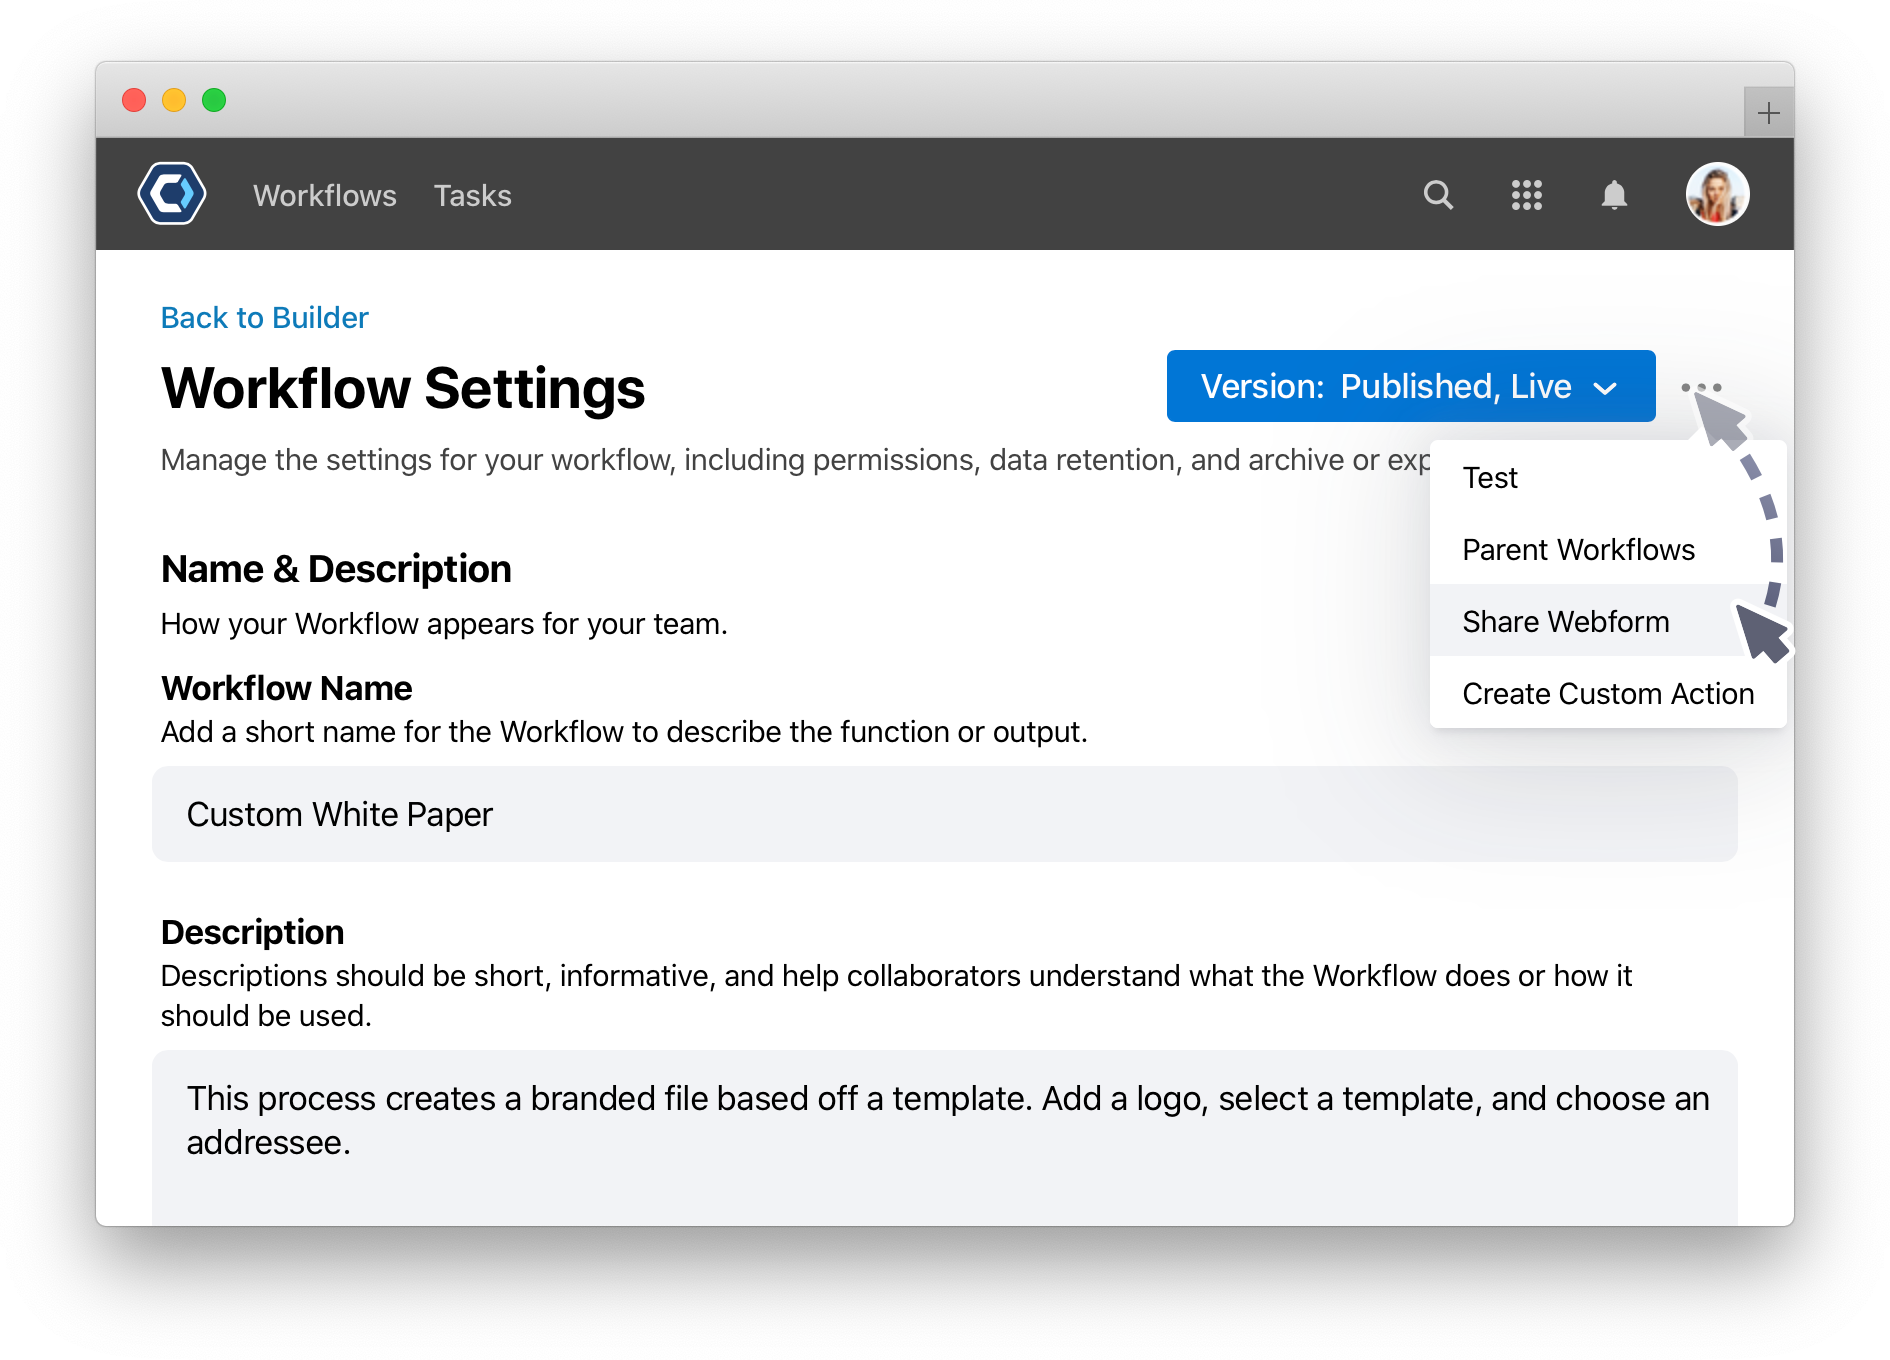
From the share web form screen, select the Link or Embed tab to choose how you’d like to share the form. For more info on both options, see the Share a link to a web form section or Embed a web form into your site section.
Thanks for your feedback
We update the Help Center daily, so expect changes soon.
Link Copied
Paste this URL anywhere to link straight to the section.