 Mail Merge Starter Template
Get started with the Mail Merge template to send batches of customized emails based on an email template and Excel spreadsheet.

How to configure this template 
In this template, you’ll start by downloading and editing a simple excel spreadsheet, then after you upload it to your PagerDuty Workflow Automation process, you can pull data from the spreadsheet and start automating your emails.
Add the Workflow from the showcase
To get started with a template, first create a new Workflow, then import the template from the showcase.
-
Select Workflows from the top navigation bar, then select


- Select Send Dynamic Emails with Mail Merge from the Showcase Templates section.
- Select

Congratulations! Because you imported the template, most of the Workflow configuration is already complete. We only have a few more steps before your process is good to go. After importing the template, you’ll land on the Workflow Builder page.
Download and open the Excel template file
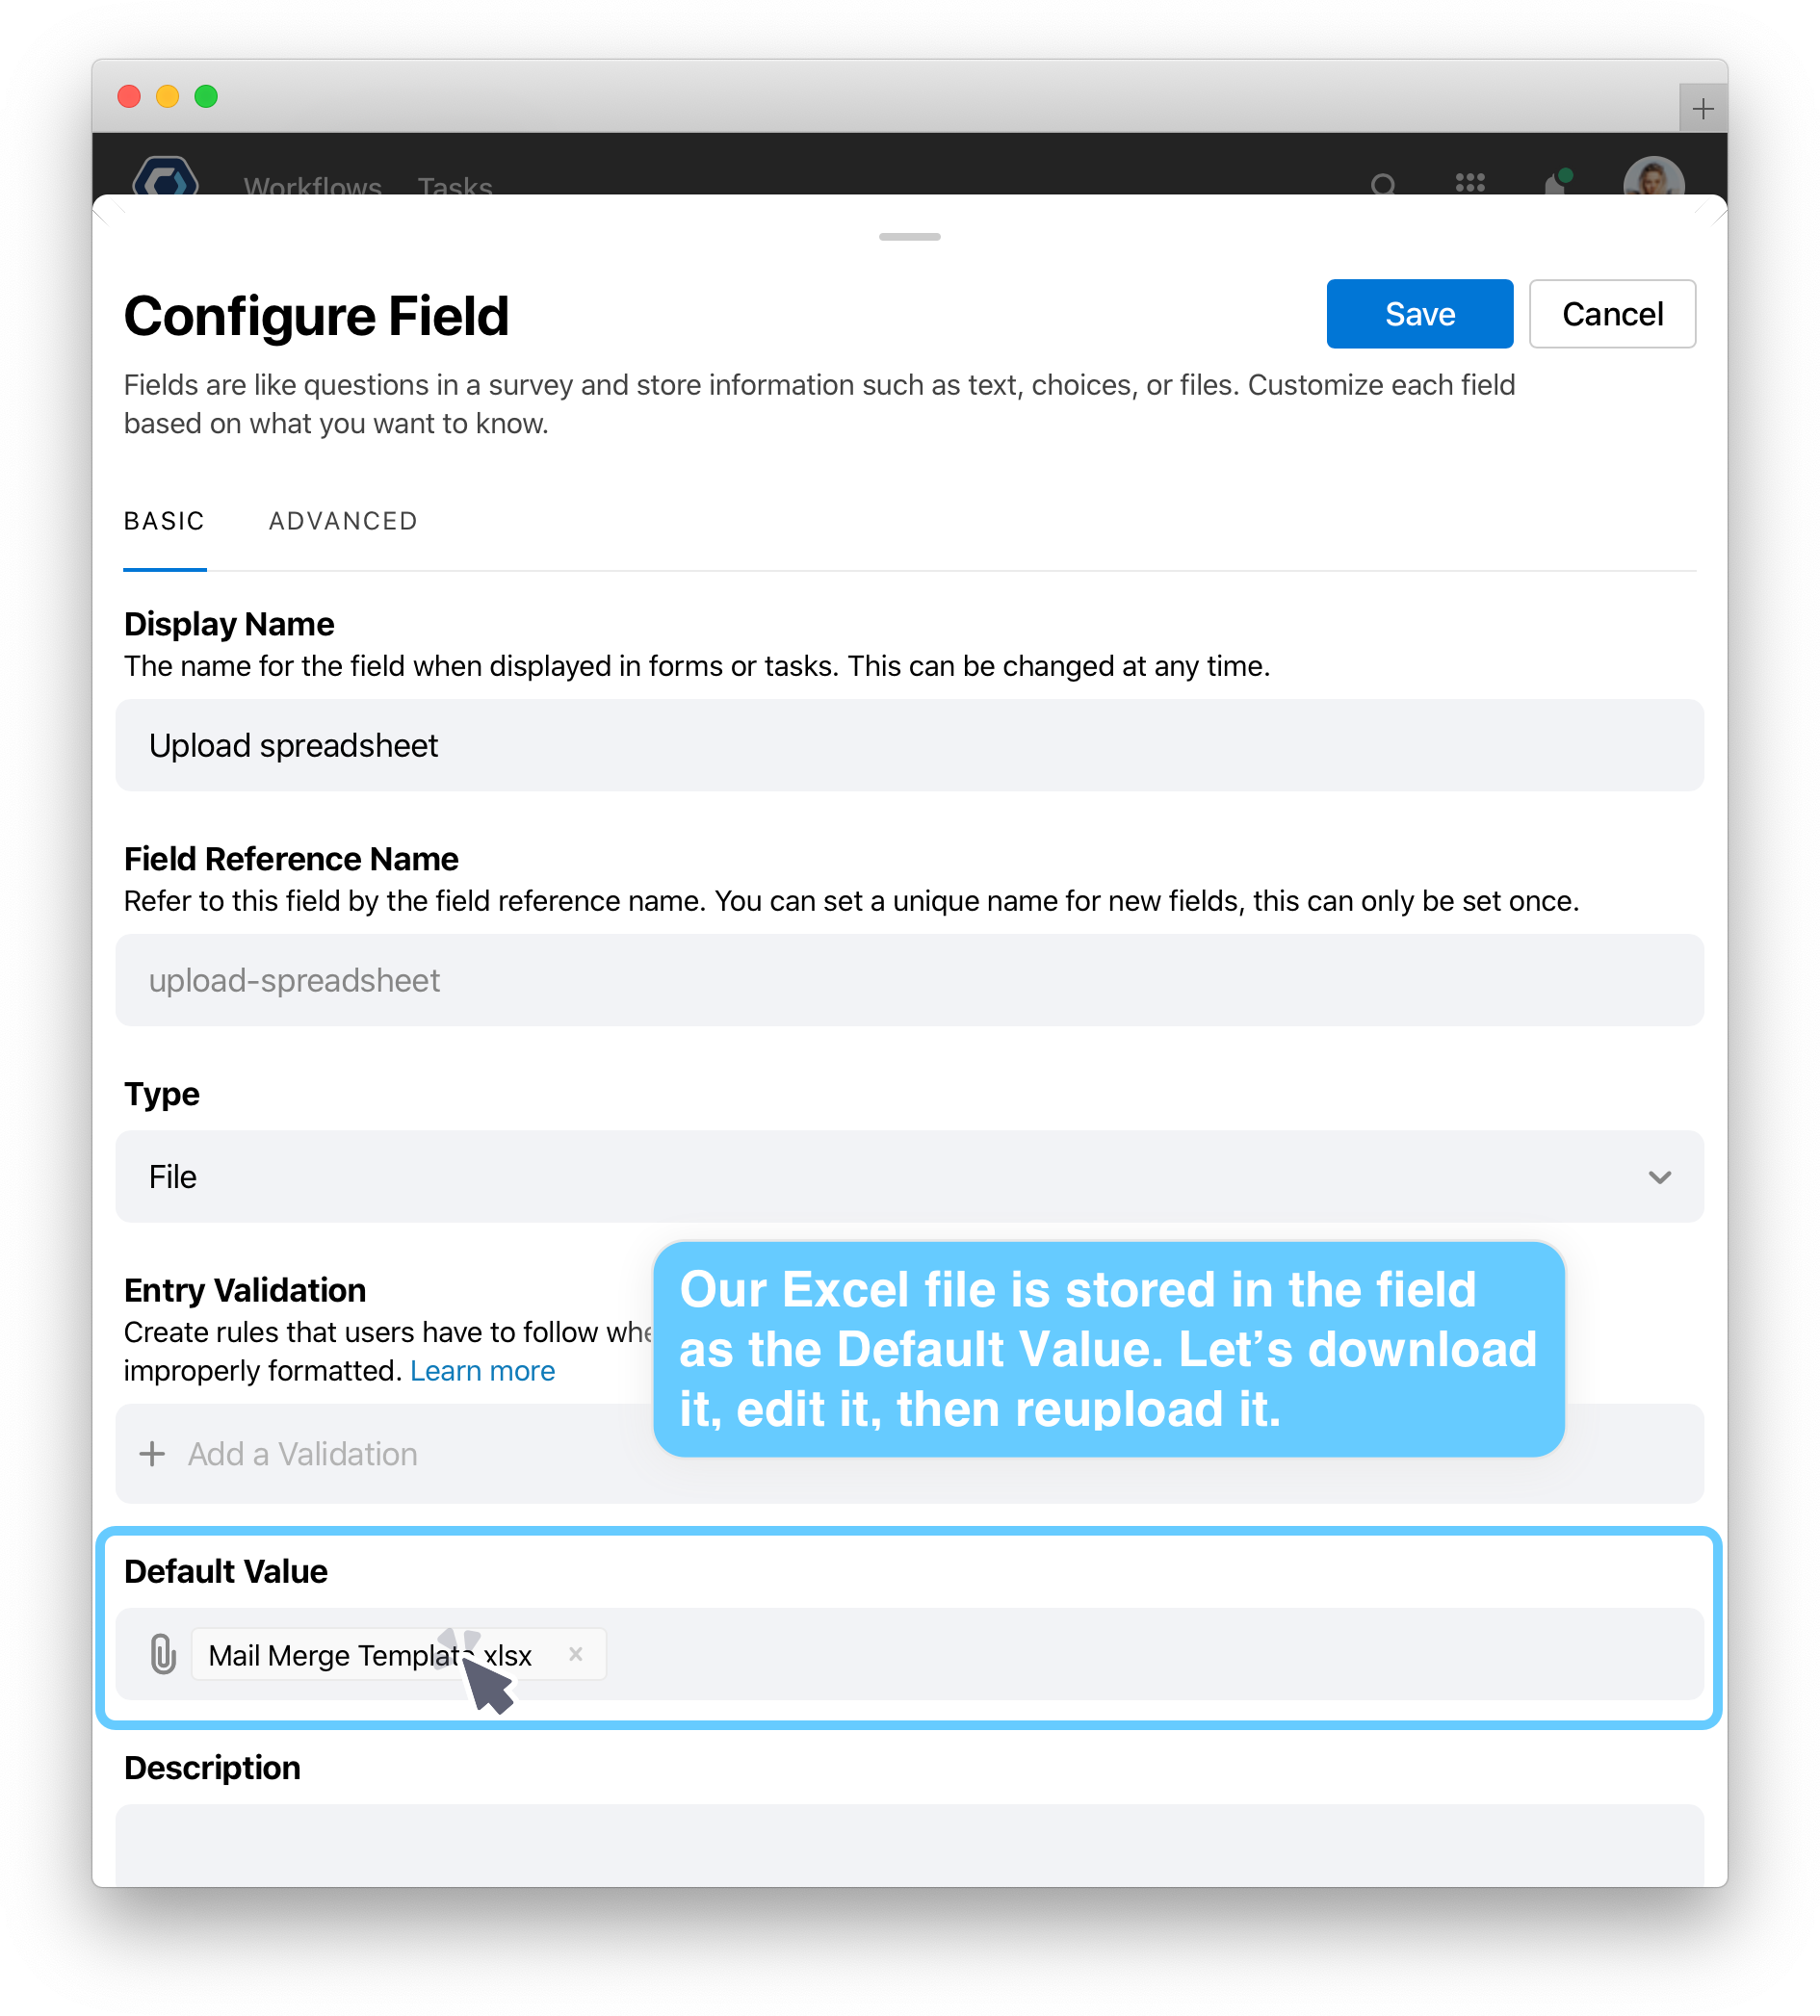
The process depends on an Excel file which is included in the template. You will download, edit, and reupload it as part of the setup. This file is stored in something called an Instance Field, which is where you can store data you want to use in every instance of your process.
-
Click the Triggers and Fields section and select the Upload spreadsheet field in the Instance Fields section.

- On the Configure Field page, scroll down to the Default Value field. This field is where we store the Excel template file.
- Click the
Mail Merge Template.xlsxto download it.
Edit and reupload the Excel template file
Each column in the Excel template is data we can reference in our email template. This is just like doing a mail merge, or if you’ve ever done a MadLib, it’s a similar idea—we’re going to “fill in the blanks” of our template with data from the Excel file. We’ll see this in more detail later.
- Open the Template in Excel. If you don’t have Excel, you can open it in your spreadsheet app of choice. Make sure you save it as an XLSX file when done.
-
For now, replace and write in your own information in the second row of the spreadsheet. This way you can test the process out on yourself before sending emails out to anyone else.

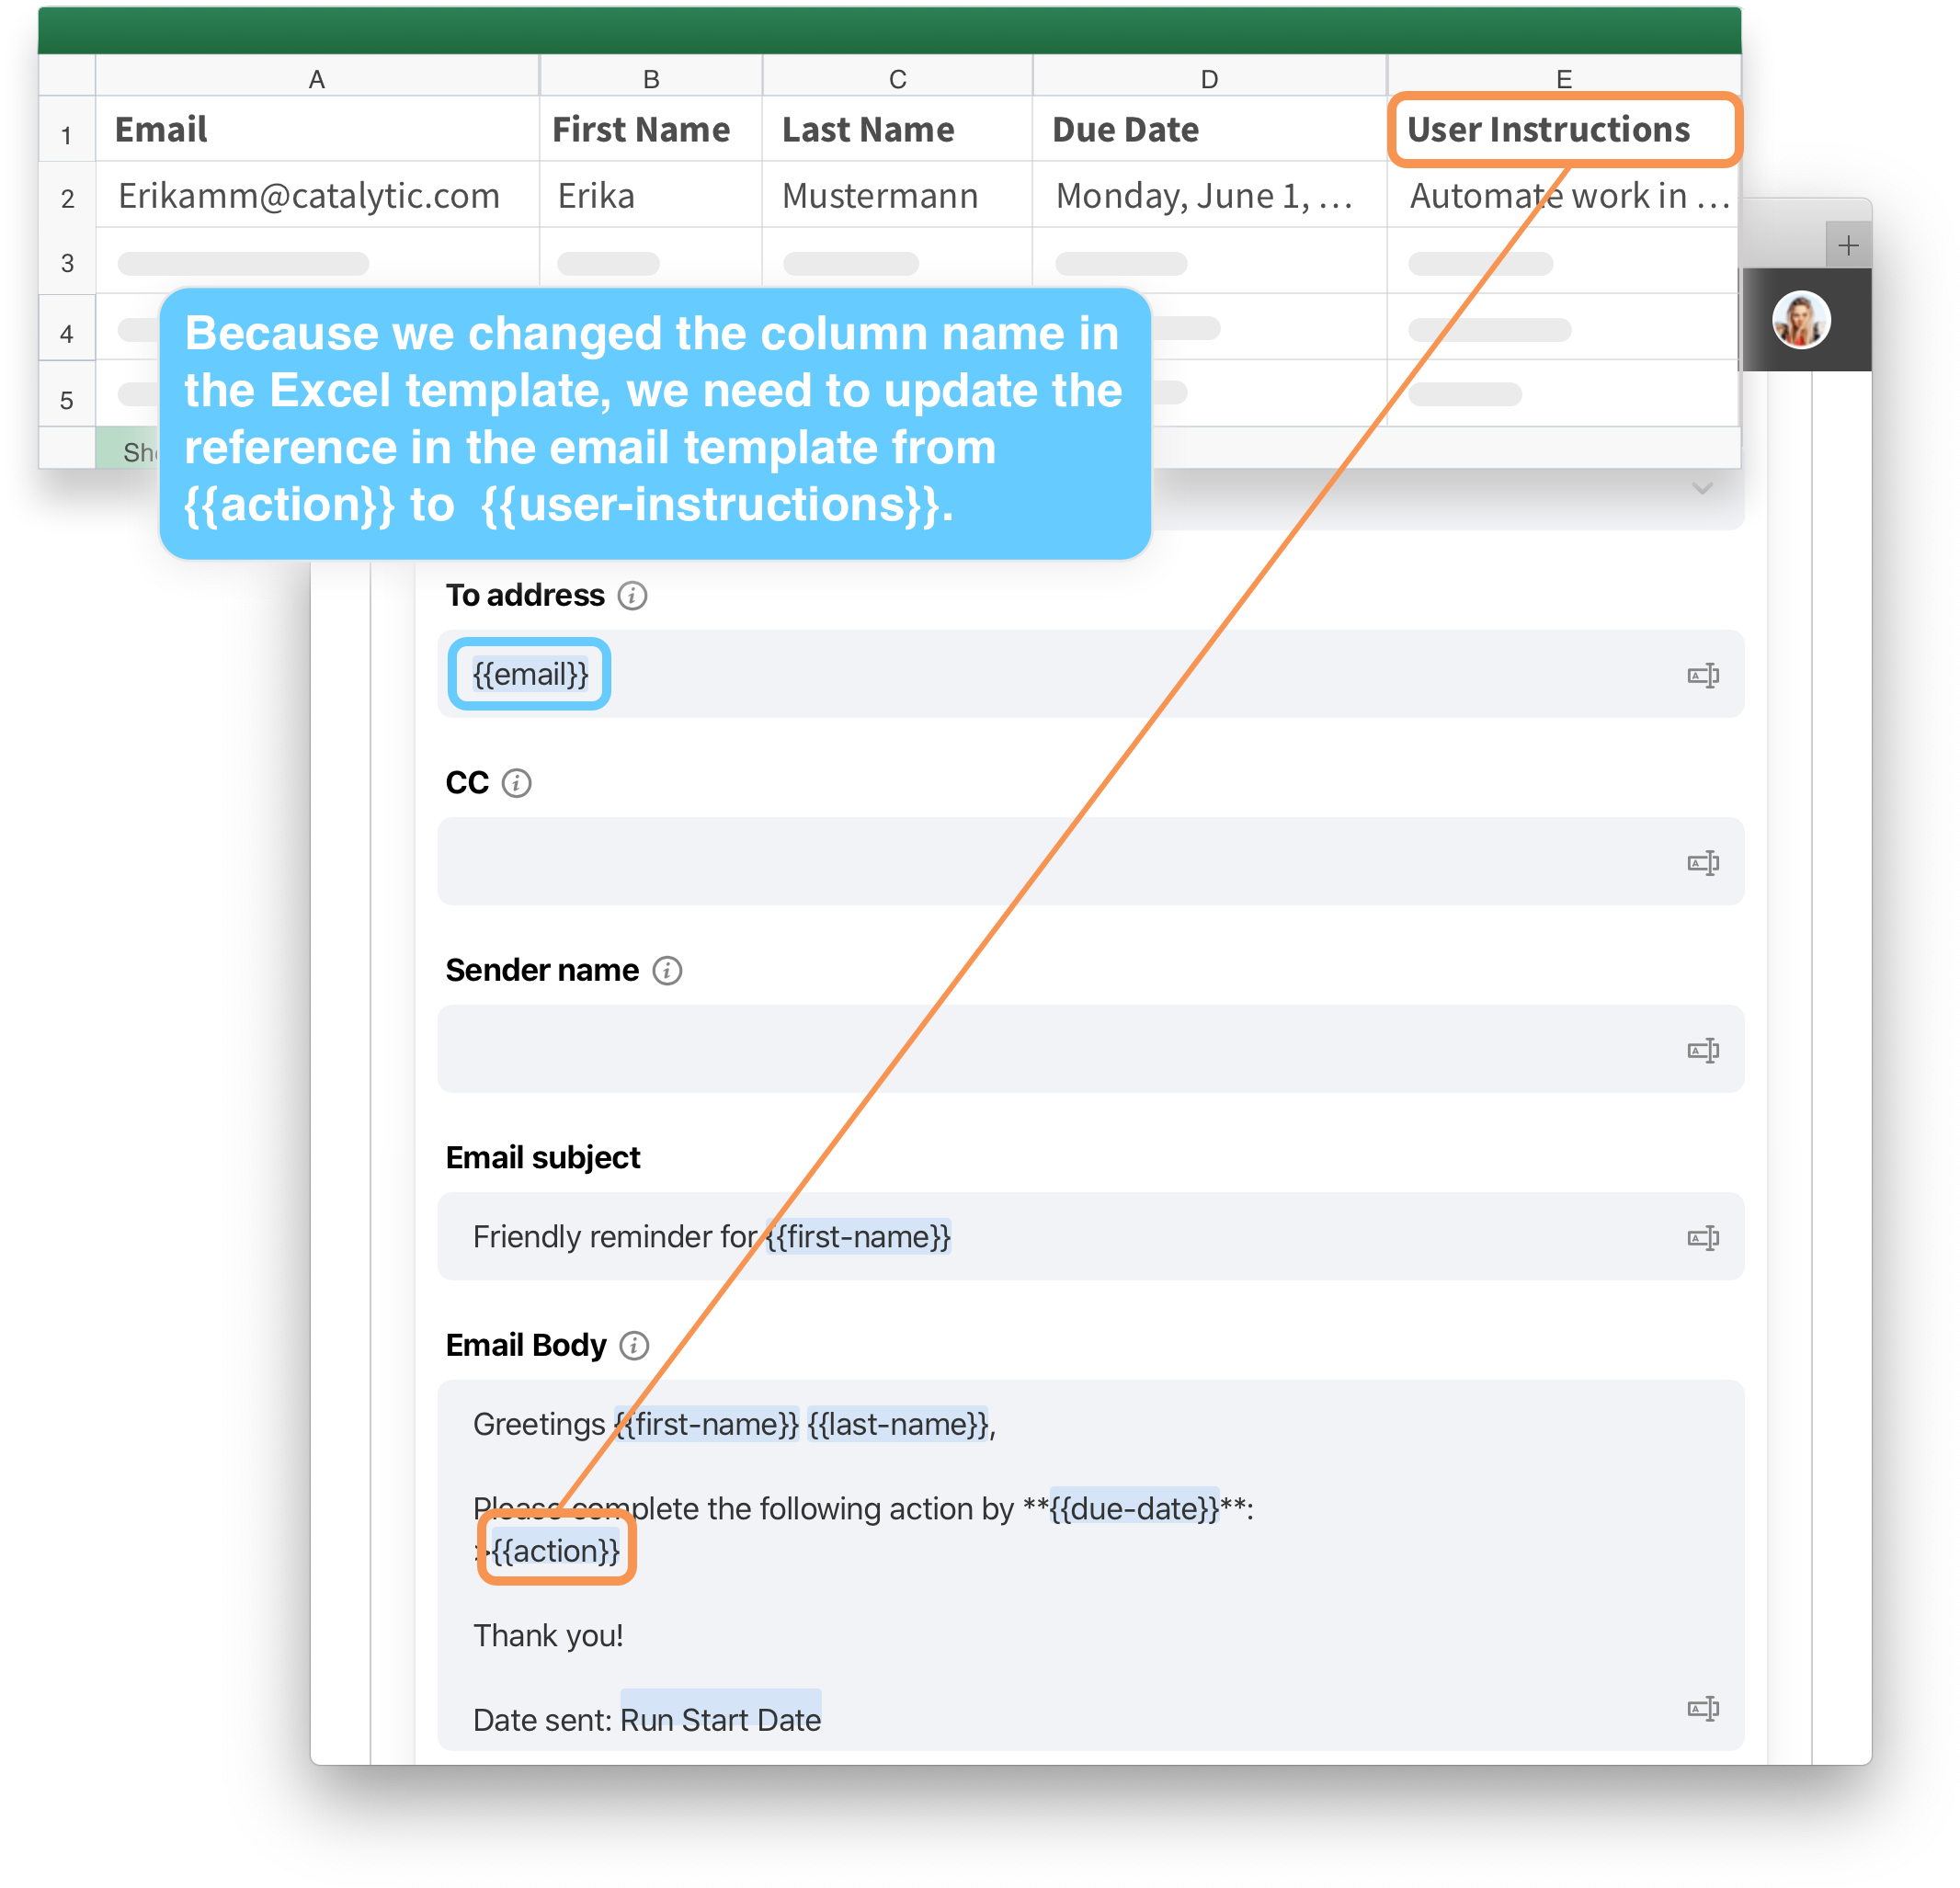
- As well, change the header of column
Efrom Actions to User Instructions. You can change the names of the columns in Excel, or even add or remove more columns. Either way, make sure you correctly update your{{field-references}}. We’ll illustrate how we change this when we Edit the email action and reference fields template next. - Save the XLSX.
- To reupload the Excel file, return to PagerDuty Workflow Automation and navigate back the Workflow Builder page. Click to open the Triggers and Fields section, then reopen the Configure Field page for the Upload Spreadsheet field.
-
From the Configure field page, delete the old template from the default value by clicking its X.

- Select the now blank field and upload your edited Excel file.
- Scroll to the top of the page and select

Edit the email action and reference fields
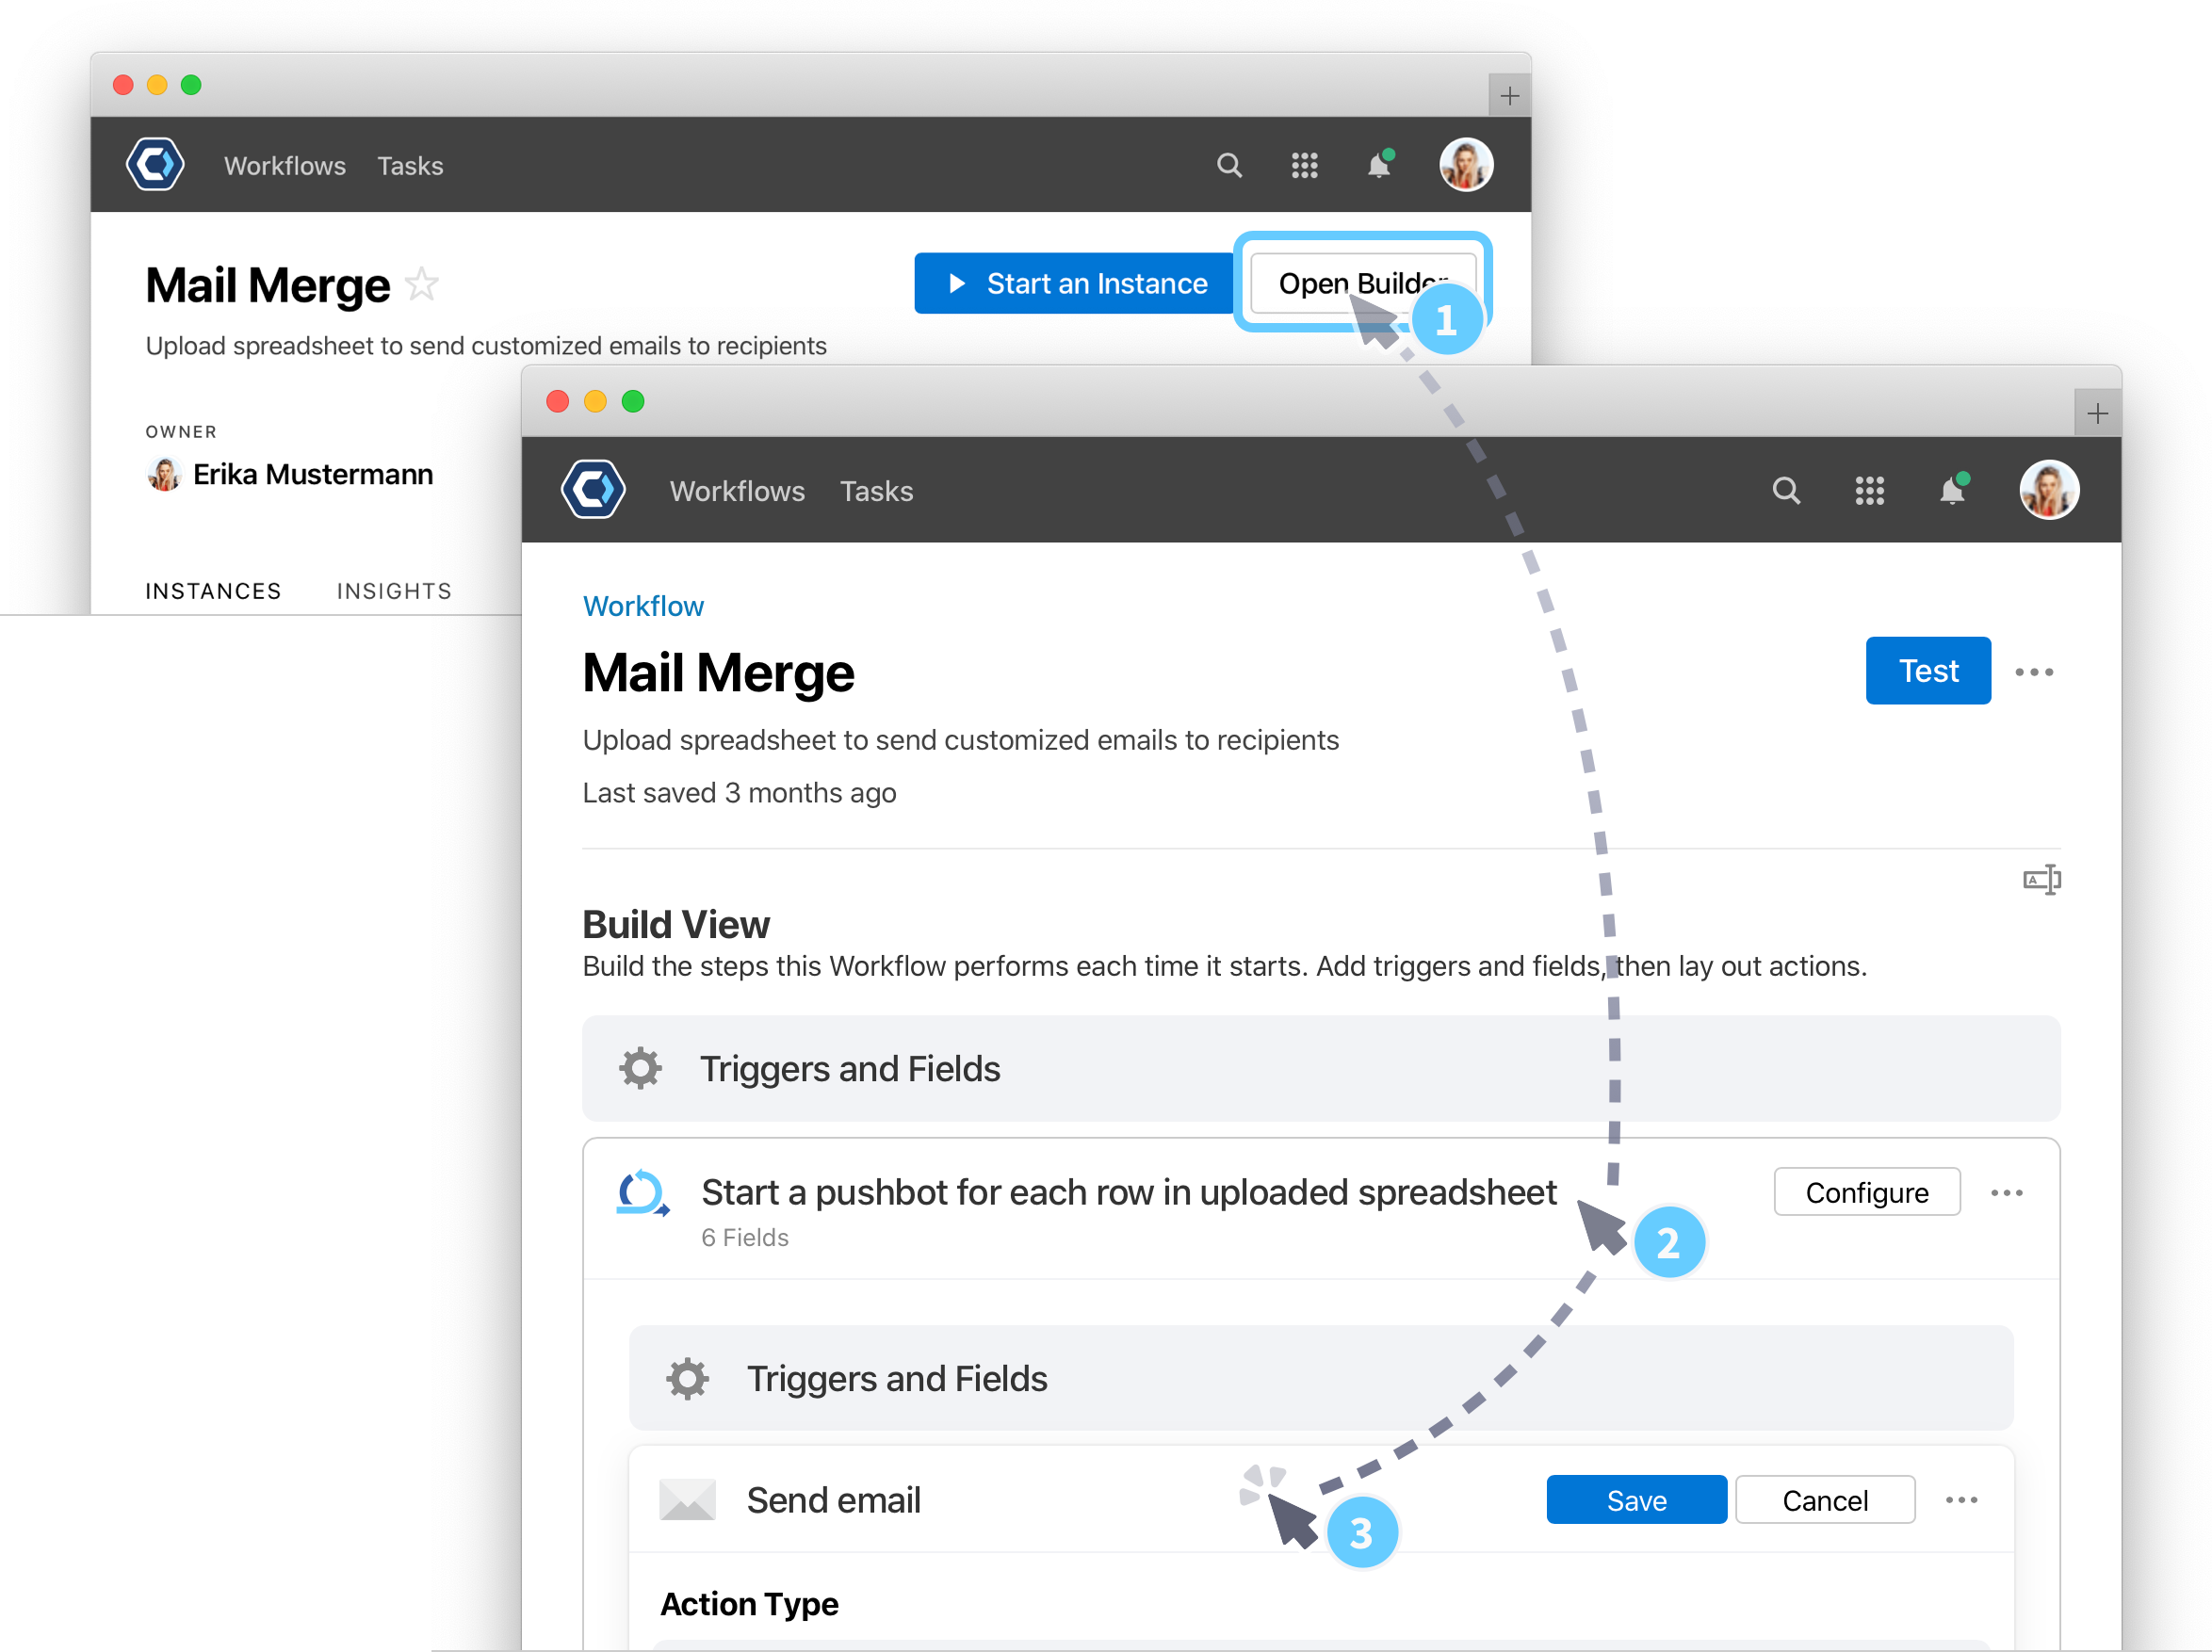
Now we can open up the actions for this Workflow, and configure the email we’ll send out. The actions are the actual steps the Workflow performs. We can access the actions from the Workflow Builder page, below the Triggers and Fields section we’ve been working in.
-
Click Start a Workflow for each row in uploaded spreadsheet to expand the section, then click Send Email to open up the send an email action.
💡 Tip: This email action is nested inside an inline action. What that means is, because we’re sending an email for each line of the Excel file, we use the Excel: Start a process for each row action first to declare we want to repeat the same steps for each row, then nest the Email: Send an email inside as the step to repeat.
- You’re now looking at the configuration for the Email: Send an email action. From here, you can set all the parameters for an email.
- Let’s leave this configured as is, but make two small changes.
- Let’s update
{{action}}to{{user-instructions}}. - Let’s change “Thank you!” to “Thank you,
{{first-name}}”.
- Let’s update
This process is now ready to test! If you test it now, and you entered your own information in the Excel template, it will send you the email. We recommend using your own email when testing so you can see the changes.
For this section, we’re just making a small change, but you can customize this email template to work for any situation. For example, our email actions support markdown formatting—you can learn more about formatting in our Markdown article.
Tips when referencing columns from an excel spreadsheet
When you reference a column in Excel, you need to use a special {{syntax}}. We recommend keeping the column names simple so it’s easy to write them out in the email template.
For example, all spaces and special characters should be replaced by - when referencing. Like in the example above, the column User Instructions is actually referenced as {{user-instructions}}, with the space replaced, and all letters lowercased.
How to manually type a field reference
Manually typing the reference is necessary if the field you need is not available in the picker. You can manually reference a field by the field reference name, {{field-reference-name}}. For example,  .
.
You can find the field reference name for fields from the field configuration page or you can write it manually.
To write it manually, use all lowercase letters and use dashes, -, to replace spaces and special characters. Underscores are accepted and do not need to be replaced with dashes. Here are some examples of the field name, and the correct field reference format:
| Field Name | {{field-name}} |
|---|---|
| Country | {{country}} |
| First Name | {{first-name}} |
| emailSendDate | {{emailsenddate}} |
| Is Approved? | {{is-approved-}} |
| Street_Address | {{street_address}} |
Also, if you have an issue with a field reference, make sure both {{ and }} are on each end, if even one { or } is missing, the reference will not work.
Test out the template
You can test a Workflow at any time, and by doing so regularly, you can spot and fix problems while you’re building. A lot of builders say they test their Workflow every time they configure a new task; we recommend that!
When you test the Workflow, you’re able to quickly and privately see how your configuration is working without making any changes or edits to the team or workplace.
-
From the top of the Workflow Builder page, select
 .
.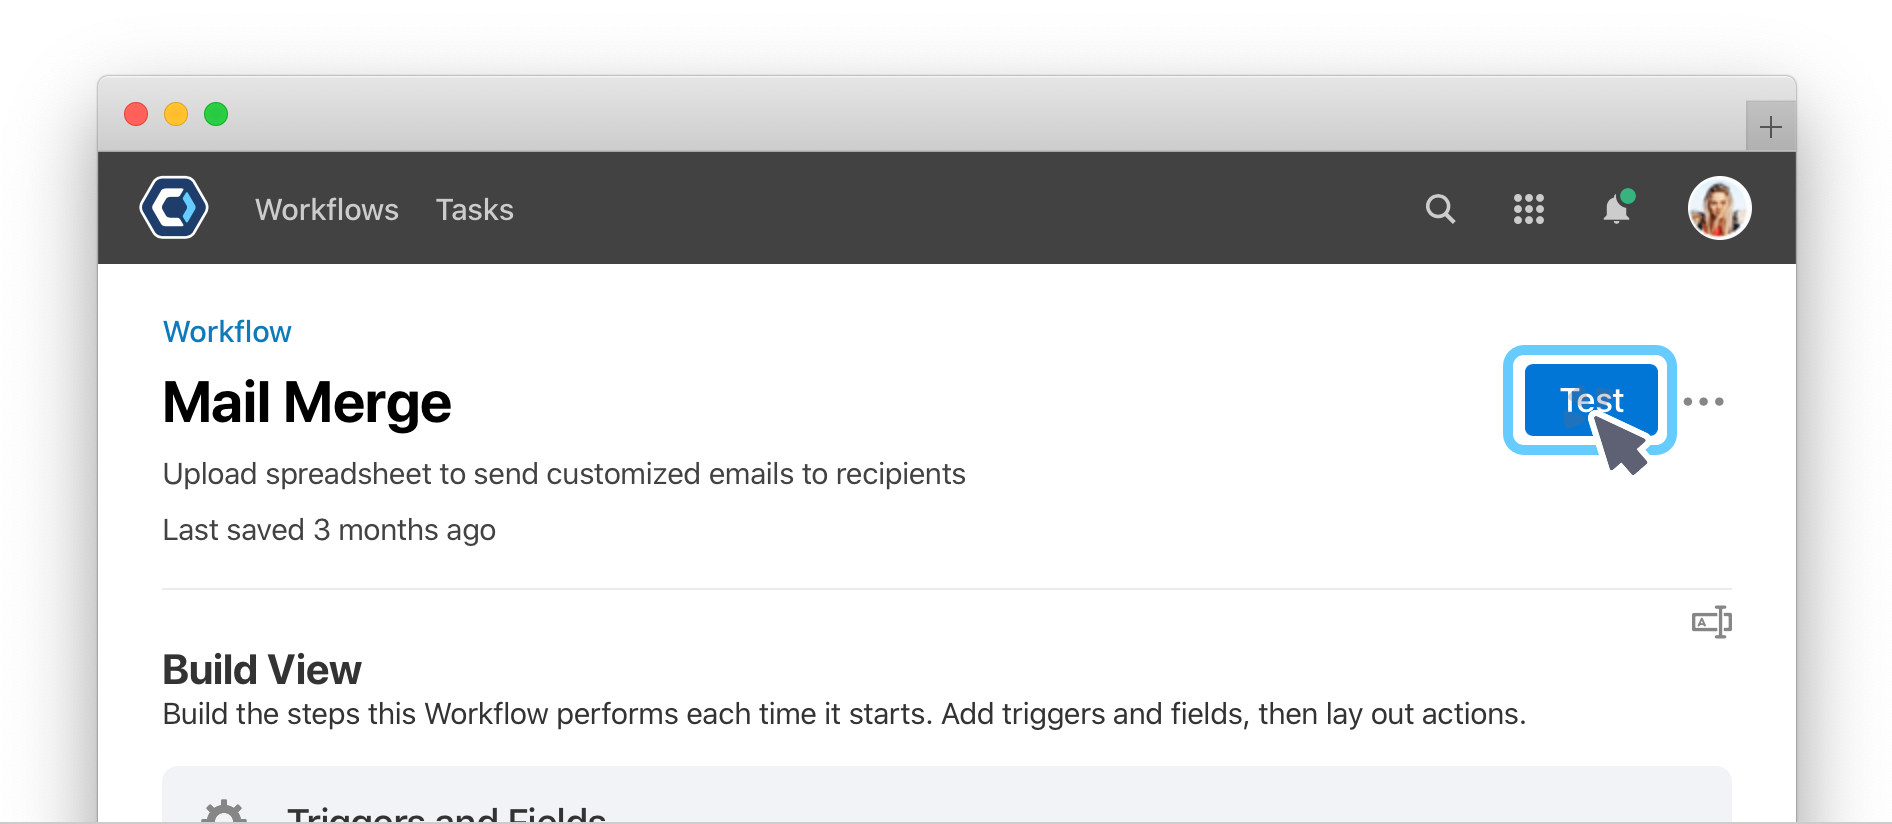
- Select the
 button.
 - The instance will begin, and you will redirect to it. Scroll down to see the assigned and pending tasks. This is called the Instance detail page.
- Once the tasks complete, it may look like the page is empty—this is because only in progress tasks are show by default. Select Status is active in the filter bar, then choose Any status to see all the completed tasks.
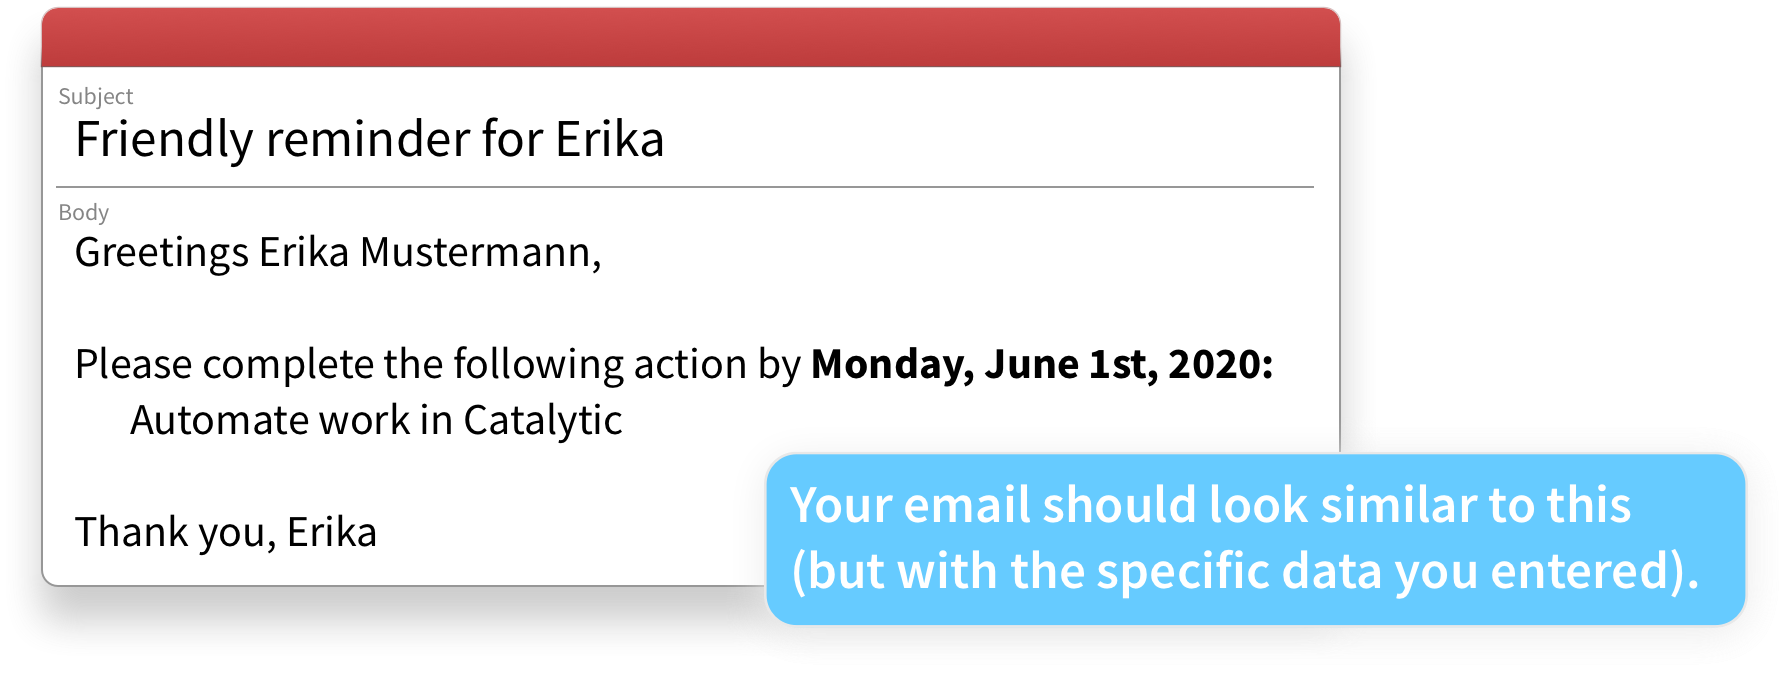
You should get an email almost instantly, and it will look something like this:
✅ Heads-up: PagerDuty Workflow Automation has built in spam prevention and won’t send the same email to the same recipient more than once an hour. For that reason, we added the {{run-start-date}} at the bottom of the email template, which makes each email unique. Keep this in the email when testing so you don’t run into problems with the spam prevention feature. You can learn more in the Ensure your emails are delivered article.
How to check the status of each email when sending multiple
If you add multiple rows to the Excel template, the Workflow will send an email for each row. To see the status of every email, you can view an instance detail page for each email sent.
- From the Instance detail, click on the action Start a Workflow for each row in uploaded spreadsheet.
-
On this new page, you can see all fields that were created by the action. Fields are different pieces of data used by, or generated by the action. This action creates a data table with the details on each email sent.
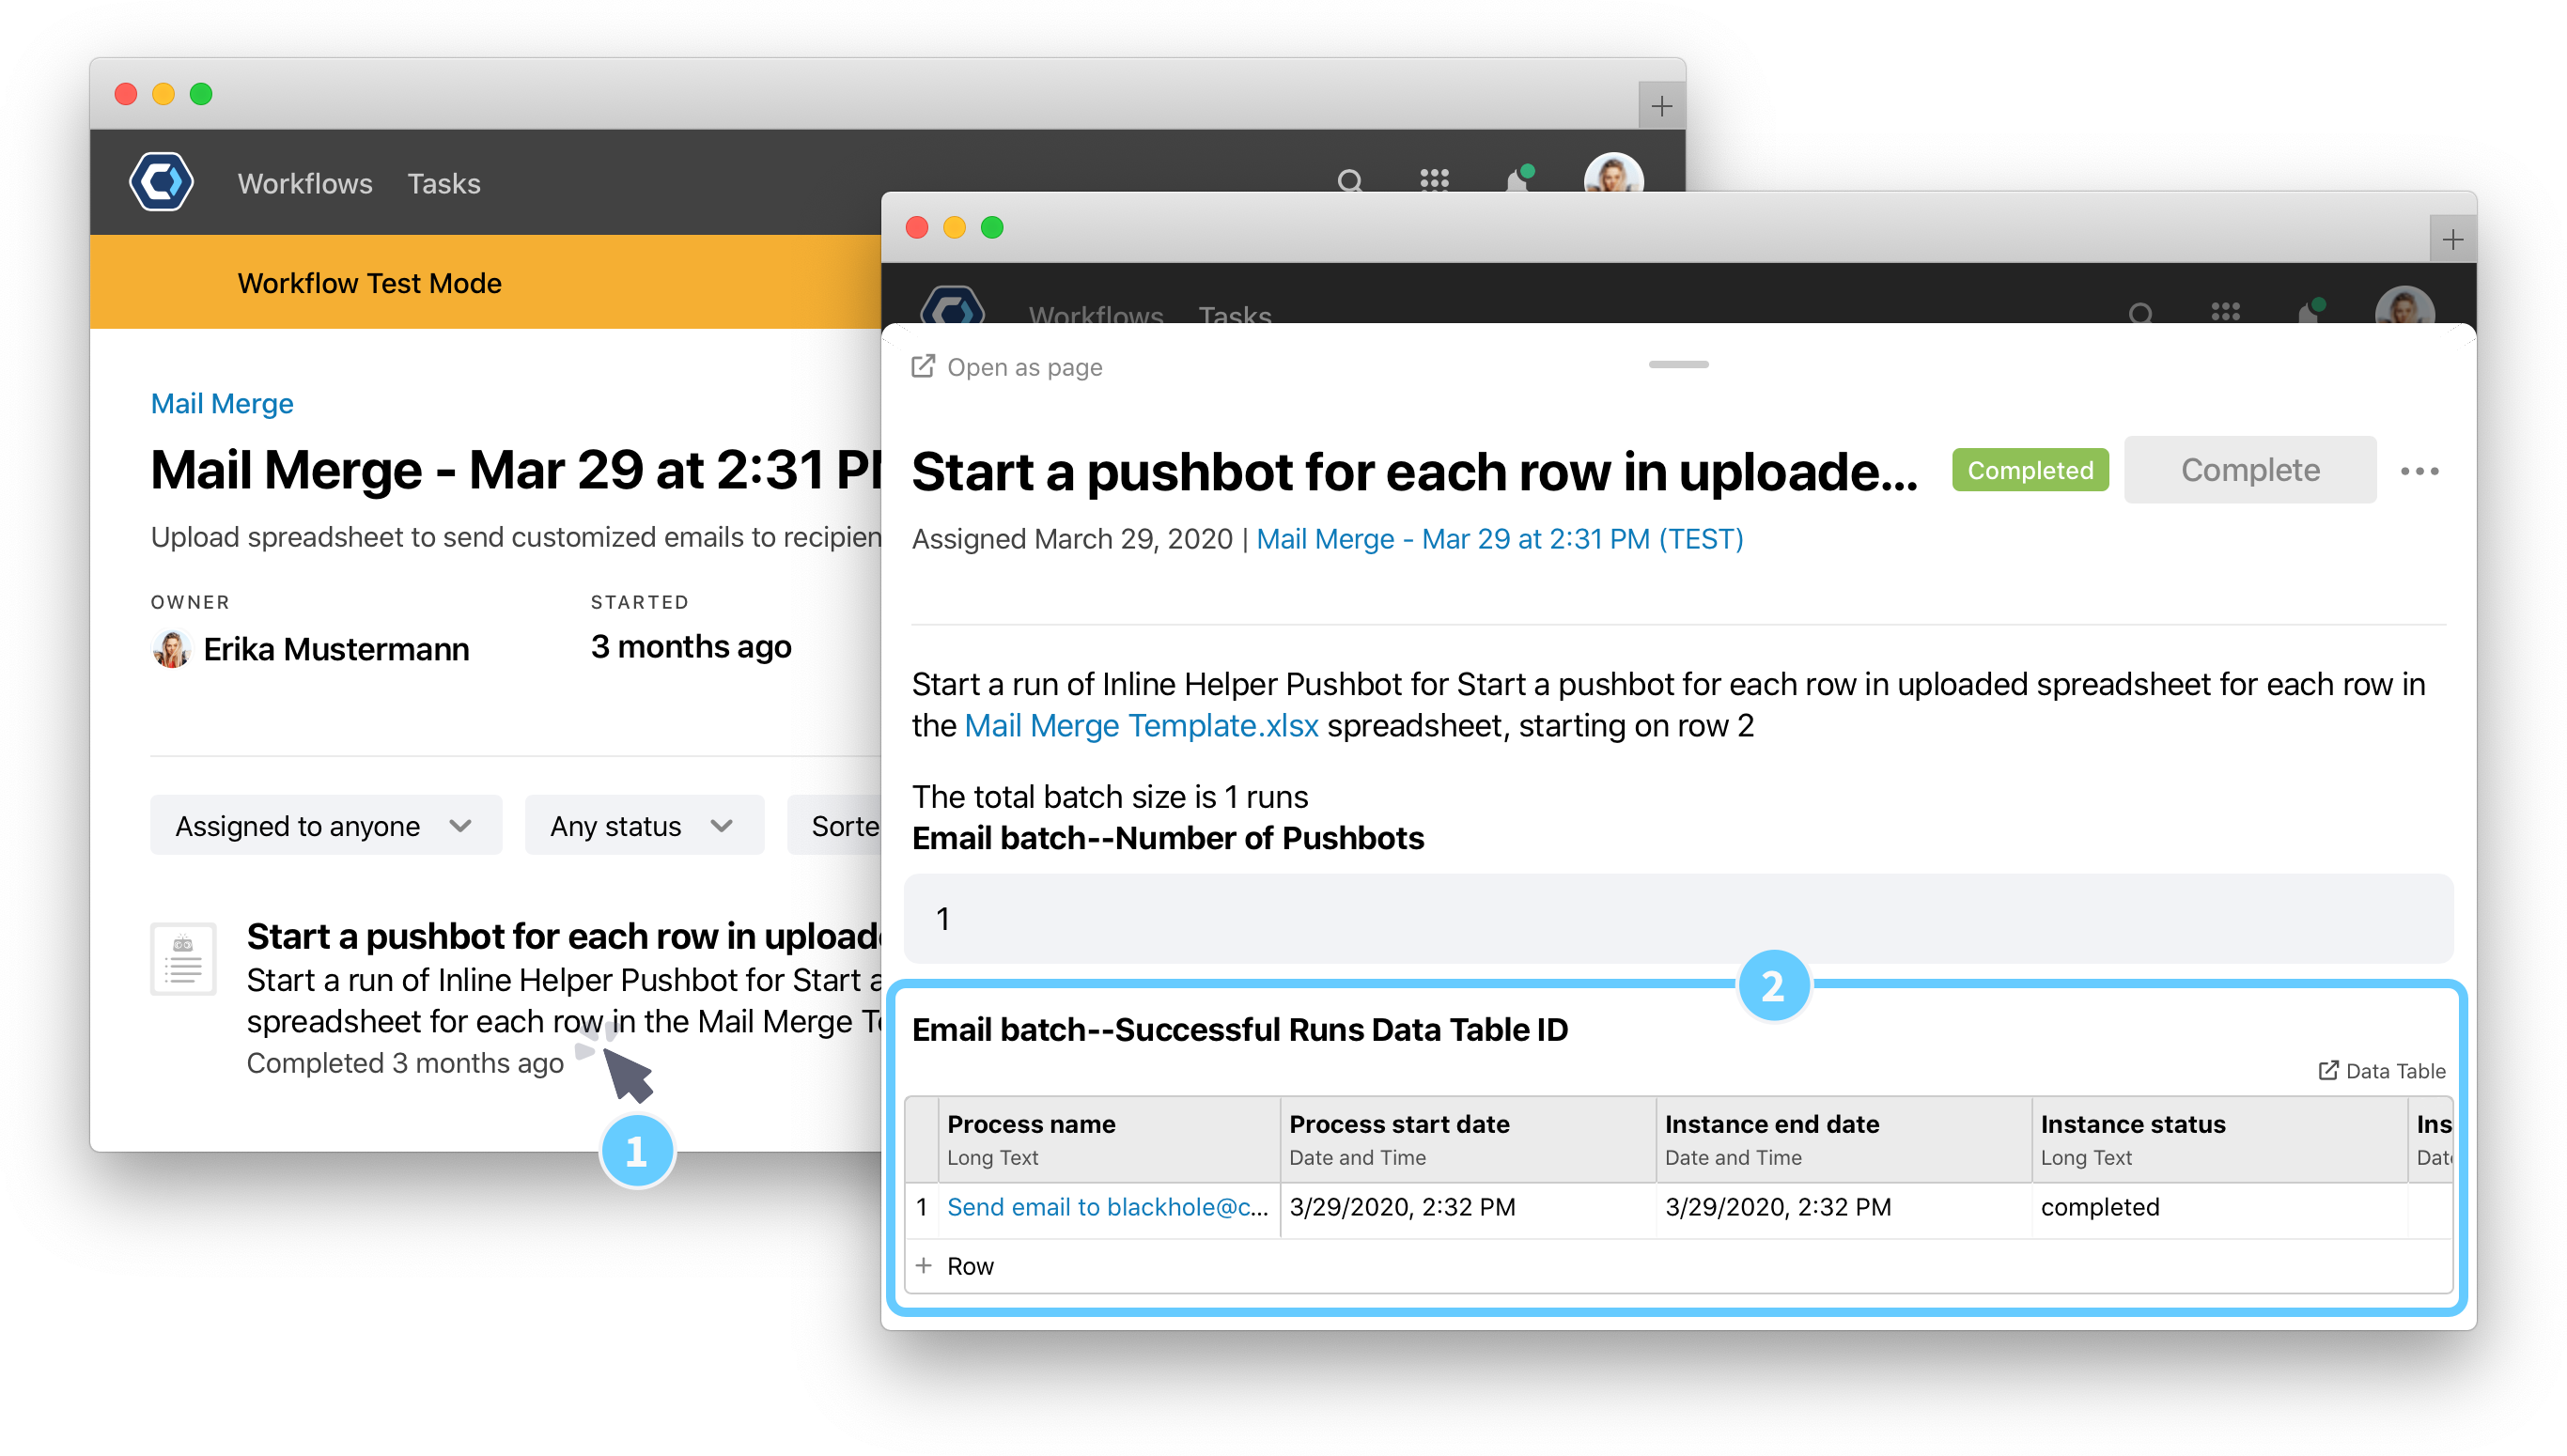
- Open the table in the Email batch–Successful Runs Data Table ID field. Each row in this table is an email sent. Click the Process name in the first column to open the instance detail page.
Extend this template
Now that you’ve finished, you can go ahead and customize and edit this template to send out batches of emails in any situation. A great next step is to go and edit the email template subject and body to something more relevant for your work—then add or update the excel template accordingly.
If you’re looking for more next steps, you could also try:
-
Change the email action to Email: Send a form to gather info from recipients. You can learn about web forms in the Create a web form and route inquiries guide. Also be sure to check out the Email: Send a form and the general web form article.
-
Integrate with a system and import data automatically to replace the spreadsheet upload. Check out our Integrations or our general integration information article.
-
Generate tailored documents or reports to send to each recipient using the Word: Create a word document or PowerPoint: Populate a template actions. You can follow a detailed guide on creating a word doc automatically in the Automate and Build a Workflow guide.
Get help with a problem or question
If something’s not working as expected, or you’re looking for suggestions, check through the options below.
Why is the “run start date” in the email body? Can I delete it?
PagerDuty Workflow Automation has built in spam prevention and won’t send the same email to the same recipient more than once an hour. For that reason, we added the {{run-start-date}} at the bottom of the email template, which makes each email unique.
Keep this in the email when testing so you don’t run into problems with the spam prevention feature. Once you’re done testing, you can remove it.
You can learn more in the Ensure your emails are delivered article.
Thanks for your feedback
We update the Help Center daily, so expect changes soon.
Link Copied
Paste this URL anywhere to link straight to the section.