 Excel: Start Process for Each Row
Use this action to batch start multiple instances, one for each row in an Excel XLSX or CSV file. This action is similar to the Tables: Start Workflow for Each Row action.
This action is considered an “iterator”, and creates inline actions, which lets you embed a Workflow directly into another process. Check the Inline actions article to learn more, or see how to use iterators to repeat actions multiple times.
Use Case 
The Excel: Start Process for Each Row action starts an instance of a Workflow for each row of a specified data table. The instances that are started by this action are referred to as Helper Workflows or subprocesses and the overall functionality is also known as a batch process.
The action has many applications and should be considered whenever the same set of actions or tasks need to be repeated for multiple objects. Examples of this include: sending emails to a list of employees or customers, starting an instance for multiple cities/offices, or generating a file for every row
A typical use case is first using a Excel: Apply filters action to first save specific rows of a data table into a new file then starting processes with this action.
How to configure this action
Because this action runs a series of steps for each row of a spreadsheet, you’ll need to choose which steps to run. You can choose to start a different Workflow, and use that Workflow’s actins; or create your own series of actions inline.
All field values in the Workflow will be available in all subprocesses this action starts. However, the field values in the subprocesses will not be accessible in the main Workflow.
💡 Tip: If you test a Workflow with this action, the subprocesses will start in test mode as well.
Fields for this action
-
Workflow
- Optionally select a Workflow that will start off each row from a list of all Workflows available on your team. The list only includes Workflows you have permission to view. By default, Build Inline is selected, and allows you to create your own series of actions to run.
- If you have a Workflow that’s already built and ready to start, you can reference it by name, ID, or field.
-
Spreadsheet file
- Use a field reference to specify an Excel XLSX or CSV file in the process.
-
Sheet
- Enter the sheet name within the Excel file, if blank the field defaults to the first created sheet. Excel sheet names default to ‘sheet1’, ‘sheet2’, etc.). Leave blank if the file is a CSV.
-
Header row number
- The row number, starting from 1, where the batch process should read data. If blank, the field defaults to 1. Leave blank if the file is a CSV.
- ✅ Heads-up: The action will always use the next row after the header row to begin the batch processing. For instance, if the header row is 8, the batch processing begins at 9. If the header row is 1, the batch processing begins at 2.
-
Batch run display name
- Input the name each sub process instance will adopt. Use field references, text, or references to a column in the form of:
columns['column-name']orcolumns['Column Display Name']- For example, with a run name of: “Sales report for
columns['sales team']”, the name of each run instance would change dynamically based on the row value in thesales teamcolumn, such as: “Sales report for team 1” or “Sales report for team 2”.
- For example, with a run name of: “Sales report for
- Input the name each sub process instance will adopt. Use field references, text, or references to a column in the form of:
-
Child run owner
- If left blank, all batch runs will be owned by the parent run owner. To have a different user own all batch runs, enter a user’s username or email in {{field-name}} format.
- 💡 Tip: To have the owner of each batch run assigned based on information in the data table, reference a data table column in columns[‘column-name’] or columns[‘Column Display Name’] format.
-
Deadline
- Select
TrueorFalsefrom the drop down to use whether or not the subprocesses should inherit the deadline from the parent Workflow.- Select
Trueto pass the process deadline to each sub-process. - Select
Falseor leave blank to set no deadline for the sub-process.
- Select
- Select
-
Complete immediately
- Select
TrueorFalsefrom the drop down to set whether the parent Workflow should wait until all sub processes complete before marking this task as completed.- Select
Trueto have this task be marked complete as soon as all sub processes are started. - Select
Falseor leave blank to have this task stay open until all sub processes are finished.
- Select
💡 Tip: It’s recommended to leave this blank or FALSE if the sub processes are expected to return data back to the parent Workflow. By leaving this blank or FALSE, the process will pause until all sub processes finish.
- Select
-
Output Field Prefix
- To help keep output fields organized, choose an output field prefix to add to the beginning of each output field name as this action may output more than one field.
- The step’s name is used as the prefix by default.
How to refer to values within the starter spreadsheet from a Helper Workflow
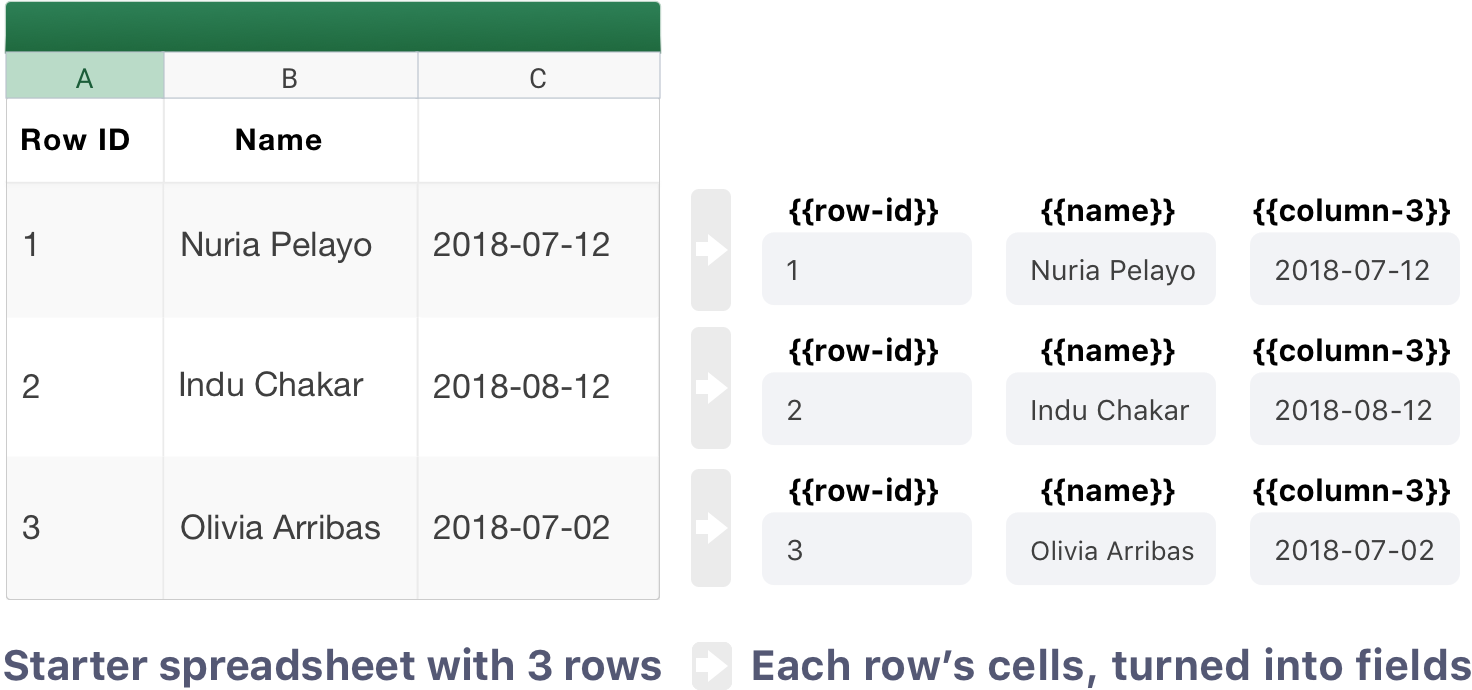
Each row of a spreadsheet starts a unique Workflow instance. In each of those instances, the cells from the starter row are converted to referenceable fields. For example, a 20 column spreadsheet would be turned into 20 fields.
The fields are referenceable by the name in the header row—every cell from the spreadsheet is available as a field based on the header row name. If a column in the header row does not have a name and is blank, it can be referenced as {{column-X}}, where X is the column number.
The fields created from each row are available only in the instance that was started from the row. For example, the fields from the second row are only available in the second instance, and not in the first or third instance.

💡 Tip: These unique column fields do not inherit the Output Field Prefix defined during configuration, they are referenced directly by their column name or number, e.g., {{column-1}}, not {{output-field-prefix--column-1}}
How to send values from a Helper Workflow back to the parent Workflow
All field values in the starter Workflow will be available in the Helper Workflow. However, the field values in the Helper Workflow are not automatically accessible in the parent Workflow.
The best way to return fields and data from a Helper Workflow back to a parent Workflow is to store values in a data table. This data table acts as an in-between where both the helper and parent can add or edit data.

What will this output?
This action will start an instance of a Workflow for each row.
This action may generate multiple fields. To help keep output fields organized, the prefix above will be added to the beginning of each of the output field names, separated by two dashes. Each field will result as:{{output-field-prefix--output-field}}. Learn more
Output fields for this action
-
Number of Workflows
- Tracks the number of Workflows started from the process.
-
Successful Runs Data Table ID
- Stores the data that logs the successful sub-process runs. Each successful run is a row in the table. The fields of each run are the columns of the table—including the
Run ID,Run display name.

- Stores the data that logs the successful sub-process runs. Each successful run is a row in the table. The fields of each run are the columns of the table—including the
-
Failed Runs Data Table ID
- The ID for the Workflow Automation data table with the failed run data. This is the same data as the CSV. The table has a row for each run, and the columns Start date and Run ID.
-
Failed Runs
- Tracks the number of sub-processes that failed.
-
Successful Runs
- Tracks the number of sub-processes that ran successfully.
-
All runs started successfully
- If all sub-processes start successfully, outputs
true. If a 1 or more runs do not start successfully, outputsfalse.
- If all sub-processes start successfully, outputs
-
Sheet name
- The sheet name referenced during configuration.
Tips
-
This action involves two processes: the initial process will include this action step; the subprocesses are the outcome of this action on each row
-
The initial process will usually only include one or two steps to bring in the spreadsheet and then begin the batch process
-
You can also use Data Tables to store information in PagerDuty Workflow Automation and reference data from within
- To reference the runID of the starter process within the subprocesses, you can use the globally available field run.rootRunID
- Use Workflow: Wait until batch processes complete to keep your batch process run open until all the runs in a batch task are complete. This way, you can end your starter run and cancel all batch-started runs.
Thanks for your feedback
We update the Help Center daily, so expect changes soon.
Link Copied
Paste this URL anywhere to link straight to the section.